
Usually, a row in a list displays one element, but there are cases when you need to show more items. Think about the list displayed in LinkedIn under the ‘Network’ section. What I want to build is something like that.
We have a card with a background, a photo, and some personal information.
We need to follow two steps:
- Create the info card
- Create the list
Create the info card
Let’s start by taking a look at the code:
struct PhotoCard: View {
    let imageName: String
    let title: String
    let subtitle: String
    var delete : () -> ()

    var body: some View {
        VStack {
            ZStack {
                VStack(spacing: 0) {
                    Color(.magenta)
                        .frame(width: .infinity, height: 50)
                    Color(.white)
                        .frame(width: .infinity, height: 50)
                }
                Image(imageName)
                  .resizable()
                  .foregroundColor(.blue)
                  .frame(width: 70, height: 70)
                  .clipShape( Circle())
            }.overlay (
                VStack {
                    HStack {
                        Spacer()
                        Button(action: delete) {
                            Image(systemName: "xmark.circle.fill")
                                .foregroundColor(.gray)
                        }
                    }.padding(5)
                    Spacer()
                }
            )
            Text(title)
                .font(.title2)
                .fontWeight(.bold)
                .frame(height: 30)
            Text(subtitle)
                .font(.subheadline)
                .foregroundColor(.secondary)
        }
        .background(Color.white)
        .cornerRadius(10)
        .shadow(radius: 5)
        .padding(1)
    }
}
The card receives the information to display, along with a callback function that is triggered when the user clicks the X button.
The card is a VStack with rounded corners—nothing special here. The interesting part is at the beginning, where we use a ZStack to display the colored background, half magenta and half white. On top of the background, we display the photo in a circular shape (automatically centered in the ZStack). The close button is displayed using the overlay and Its position is achieved by working with a combination of VStack, HStack, and Spacer.
Create the list
The code:
struct Person: Identifiable {
let id = UUID()
var name: String
var title: String
var image: String
}
struct ContentView: View {
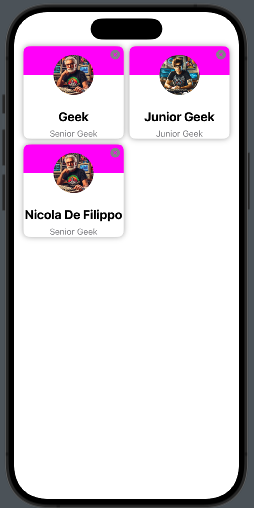
@State var items = [Person(name: "Geek", title: "Senior Geek", image: "image"),
Person(name: "Junior Geek", title: "Junior Geek", image: "junior"),
Person(name: "Nicola De Filippo", title: "Senior Geek", image: "image")]
var body: some View {
GeometryReader { geometry in
NavigationView {
ScrollView {
ForEach((0...items.count / 2), id: \.self) { index in
HStack {
Spacer()
if items.count > index * 2 {
PhotoCard(
imageName: items[index * 2].image,
title: items[index * 2].name,
subtitle: items[index * 2].title, delete:
{
delete(index * 2)
}
).frame(width: geometry.size.width * 0.45)
}
if items.count > index * 2 + 1 {
PhotoCard(
imageName: items[index * 2 + 1].image,
title: items[index * 2 + 1].name,
subtitle: items[index * 2 + 1].title,
delete:
{
delete(index * 2 + 1)
}
).frame(width: geometry.size.width * 0.45)
} else {
Divider()
.frame(width: geometry.size.width * 0.45, height: 0)
}
Spacer()
}
}
}.listStyle(PlainListStyle())
.environment(\.defaultMinListRowHeight, 1)
.onAppear {
UITableView.appearance().separatorStyle = .none
UITableView.appearance().separatorColor = .clear
}
}
.navigationTitle("Fruit List")
}
}
func delete(_ index: Int) {
self.items.remove(at: index)
}
}
At the top, we define a Person struct that contains the details of each person. Then, we create an array with three people. We use GeometryReader to calculate the card width as a percentage of the screen width. The iteration is performed over half the length of the items since we are displaying two elements per row. Note that if the number of items is odd, the last element is a Divider. When the application starts, we modify the list properties to remove the line separators.
Finally, we define the delete function, which removes an element at the specified index. This function is passed as a property to the card view.
Replace my information and image with yours, and have fun with it!
Note: English is not my native language, so I’m sorry for some errors. I appreciate if your correct me. Only the image is by AI.