With this post, a short series about SwiftData begins. The goal of this tutorial is to learn SwiftData by building a Pomodoro app (we’ll be using code from another one of my tutorials). SwiftData replaces CoreData, and I can say that CoreData is a pain for any iOS developer. With SwiftData, things are much simpler. Enough with the introduction, let’s start.
In this post, we’ll cover:
- How to create a project with SwiftData
- How to create entities
- How to create relations between entities
- How to display data
- How to insert data
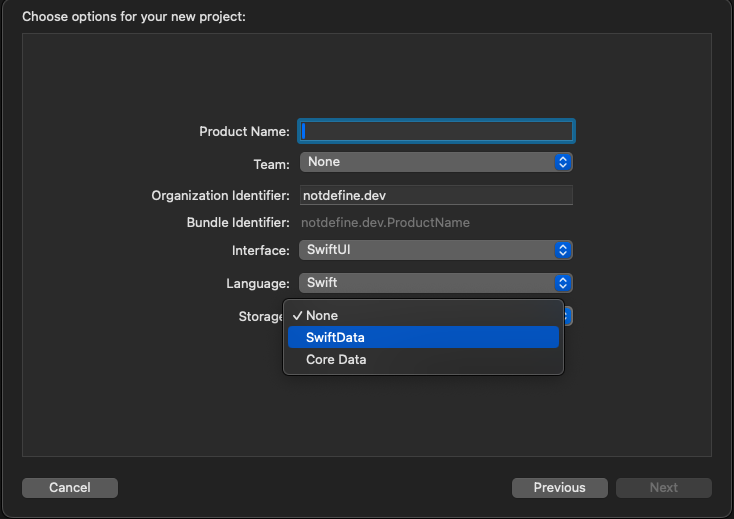
How do you create a project that needs SwiftData? Simply take a look at the screenshot:

So, in the storage section, choose SwiftData. This will automatically add the necessary code to your …App file. You should have something like this:
import SwiftUI
import SwiftData

@main
struct SavePomodoroAppApp: App {
    var sharedModelContainer: ModelContainer = {
        let schema = Schema([
            Item.self,
        ])
        let modelConfiguration = ModelConfiguration(schema: schema, isStoredInMemoryOnly: false)

        do {
            return try ModelContainer(for: schema, configurations: [modelConfiguration])
        } catch {
            fatalError("Could not create ModelContainer: \(error)")
        }
    }()

    var body: some Scene {
        WindowGroup {
            ContentView()
        }
        .modelContainer(sharedModelContainer)
    }
}
The sharedModelContainer is the ModelContainer that is created considering the schema and the configuration. Note that in the configuration, it is possible to define whether we want to store the data only in memory or not.
How do you create an entity? Use the keyword model:
import Foundation
import SwiftData

@Model
final class ProjectItem: Identifiable {
    var name: String
    var id = UUID().uuidString
    init(name: String) {
        self.name = name
    }
}
In this case, we want to create an entity Project that has a name and a UUID identifier (for this reason, we specify the protocol Identifiable).
Now, how do we create relations between entities? Suppose we want an entity Pomodoro where every pomodoro has a project:
import Foundation
import SwiftData

@Model
final class PomodoroItem {
    var start: Date
    var end: Date
    var project: ProjectItem
    var name: String

    init(start: Date, end: Date, project: ProjectItem, name: String) {
        self.start = start
        self.end = end
        self.project = project
        self.name = name
    }
}
Simply, we add a variable project of type ProjectItem.
Now we can change the schema in the …App file:
@main
struct SavePomodoroAppApp: App {
    var sharedModelContainer: ModelContainer = {
        let schema = Schema([
            PomodoroItem.self,
            ProjectItem.self,
        ])
        . . .
}
How to display data?
First, create the main view for our application:
struct ContentView: View {
    var body: some View {
        TabView {
            PomodoriView()
            .tabItem {
                Label("Pomodori", systemImage: "calendar.day.timeline.left")
            }
            ProjectsView()
            .tabItem {
                Label("Projects", systemImage: "list.bullet")
            }
        }
    }
}
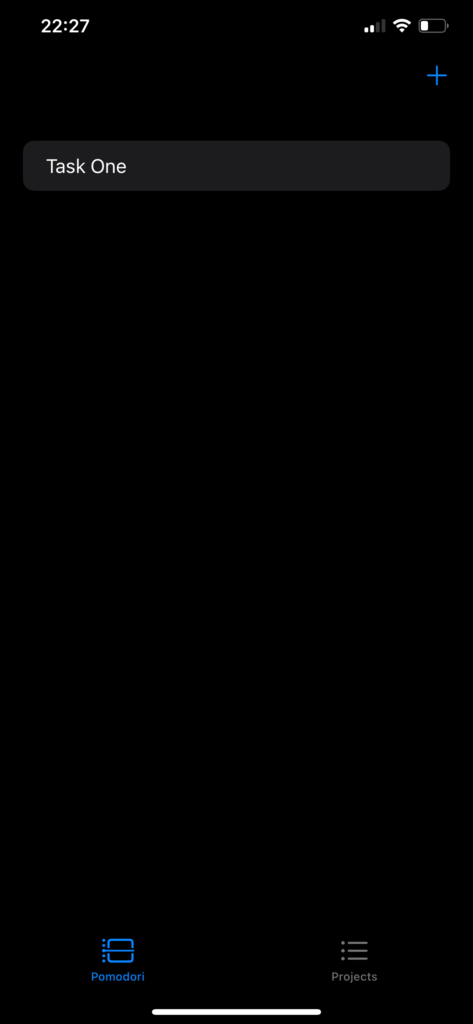
So, two tabs: one for Pomodoro and another for Projects.
Take a look at the PomodoriView to see how to display data:
import SwiftUI
import SwiftData

struct PomodoriView: View {
    @Query private var pomodori: [PomodoroItem]
    @State var isPresented = false

    var body: some View {
        NavigationStack {
            List {
                ForEach(pomodori) { pomodoro in
                    Text(pomodoro.name)
                }
            }
            .toolbar {
                ToolbarItem {
                    Button(action: {isPresented = true}) {
                        Label("Add Pomodoro", systemImage: "plus")
                    }
                }
            }.sheet(isPresented: $isPresented, content: {
                PomodoroView()
            })
        }
    }
}
So, with the Query, we load all the PomodoroItem and display them in a list.
The view for the projects is similar:
struct ProjectsView: View {
    @Query private var projects: [ProjectItem]
    @State var isPresented = false

    var body: some View {
        NavigationStack {
            List {
                ForEach(projects) { project in
                    Text(project.name)

                }
            }
            .toolbar {
                ToolbarItem {
                    Button(action: {isPresented = true}) {
                        Label("Add Project", systemImage: "plus")
                    }
                }
            }.sheet(isPresented: $isPresented, content: {
                ProjectView()
            })
        }
    }
}
Both of these views have an add button. By tapping on it, we can insert a project or a pomodoro. Take a look at the project:
import SwiftUI
import SwiftData

struct ProjectView: View {
    @Environment(\.modelContext) private var modelContext
    @Environment(\.dismiss) private var dismiss
    @State var projectName = ""

    var body: some View {
        VStack {
            TextField("Project name", text: $projectName)
            Button("Save") {
                let newProject = ProjectItem(name: projectName);
                modelContext.insert(newProject)
                dismiss()
            }

        }.padding()
    }
}
In this view, we declare an environment to call the modelContext to operate on the data and the dismiss to close the sheet.
In the action of the save button, we create a ProjectItem with a name and save it.
The process to create a pomodoro is a bit different:
import SwiftUI
import SwiftData

struct PomodoroView: View {
    @Environment(\.modelContext) private var modelContext
    @Environment(\.dismiss) private var dismiss
    @Query private var projects: [ProjectItem]
    @State var selectedProject: ProjectItem?
    @State var pomodoroName: String = ""

    var body: some View {
        VStack {
            Picker("Please choose a project", selection: $selectedProject) {
                            ForEach(projects) { project in
                                Text(project.name)
                                    .tag(Optional(project))
                            }
                        }
            TextField("Pomodoro name", text: $pomodoroName)
            Button("Start") {
                let pomodoro = PomodoroItem(start: Date(), end: Date(), project: selectedProject!, name: pomodoroName)
                modelContext.insert(pomodoro)
                dismiss()
            }
        }
    }
}
In this case, considering that every pomodoro has a project, we load all the projects and display the project names using a picker. Please note that in the picker, we use the tag with Optional (because we can select nothing). If we omit this, we get an error: “Picker: the selection ‘nil’ is invalid and does not have an associated tag, this will give undefined results.” If you tap on the picker, nothing happens.
For now, the start button doesn’t start anything, but we simply save the pomodoro by assigning a project name and the current date.

The code https://github.com/niqt/SavePomodoroApp
Note: English is not my native language, so I apologize for any errors. I use AI solely to generate the banner of the post; the content is human-generated.


1 comment