In this post, we’ll learn how to use LazyVGrid and LazyHGrid, two powerful and efficient grids to display multiple items.
The fundamental element for these types of grids is the GridItem, which can be of three types:
.adaptive
.fixed
.flexible
GridItem Adaptive
GridItem Adaptive is essential for a responsive layout. By setting a minimum size for it, the grid will try to adapt to all the available space.
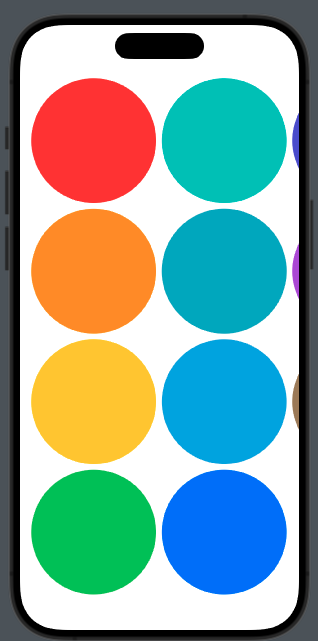
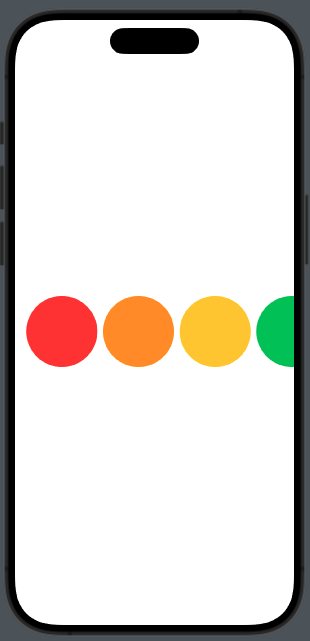
Take a look at using LazyHGrid:
struct ContentView: View {
    let rainbowColors = [Color.red, Color.orange, Color.yellow, Color.green, Color.mint, Color.teal, Color.cyan, Color.blue, Color.indigo, Color.purple, Color.brown]
    var body: some View {
        ScrollView(.horizontal) {
            LazyHGrid(rows: [GridItem(.adaptive(minimum:150))]) {
                        ForEach(rainbowColors, id:\.self) { color in
                            Circle()
                            .fill(color)
                        }
                    }
                    .padding()
                }
    }
}
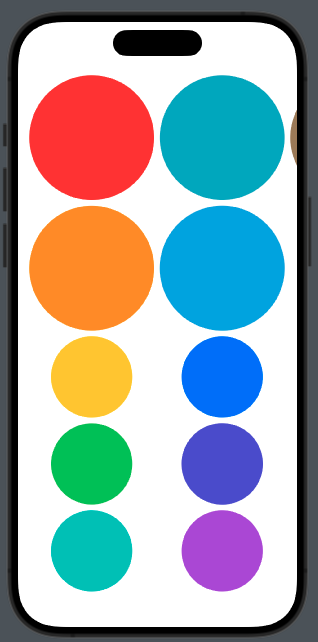
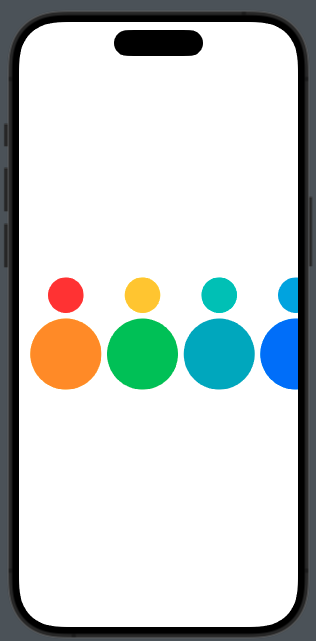
We can also define different sizes for the rows:
ScrollView(.horizontal) {
            LazyHGrid(rows: [GridItem(.adaptive(minimum:150)),GridItem(.adaptive(minimum:100))]) {
                        ForEach(rainbowColors, id:\.self) { color in
                            Circle()
                                                    .fill(color)
                        }
                    }
                    .padding()
                }
So we have:
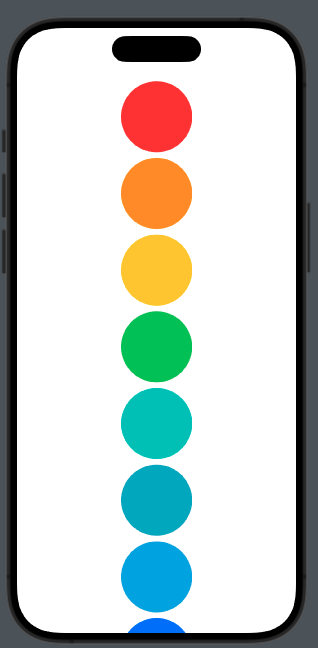
So, the two different dimensions are used to adapt to the screen.
This type is helpful when we have a dynamic number of elements, such as in a playlist.
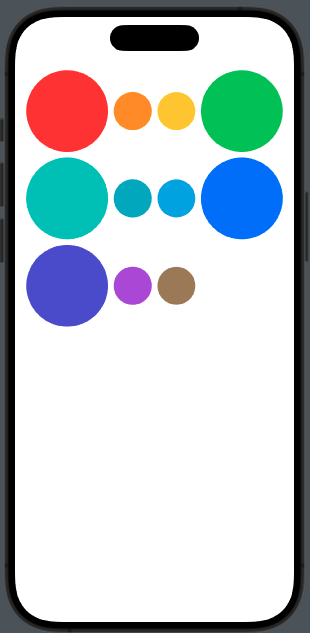
Using the Vertical grid:
ScrollView() {
            LazyVGrid(columns: [GridItem(.adaptive(minimum:100)), GridItem(.adaptive(minimum:50)),GridItem(.adaptive(minimum:100))]) {
                        ForEach(rainbowColors, id:\.self) { color in
                            Circle()
                            .fill(color)
                        }
                    }
                    .padding()
                }
}
GridItem Fixed
In this case, the GridItem has a fixed size for the horizontal layout:
ScrollView(.horizontal) {
            LazyHGrid(rows: [GridItem(.fixed(100))]) {
                ForEach(rainbowColors, id:\.self) { color in
                    Circle()
                                            .fill(color)
                }
            }
            .padding()
        }
For vertical:
ScrollView() {
            LazyVGrid(columns: [GridItem(.fixed(100))]) {
                    ForEach(rainbowColors, id:\.self) { color in
                        Circle()
                        .fill(color)
                    }
                }
                .padding()
            }
}
This is helpful when you need a fixed number of columns or rows. In this case, by adding GridItem with a fixed size, we don’t have adaptability to the screen.
Take a look at this example:
ScrollView() {
            LazyVGrid(columns: [GridItem(.fixed(150)),GridItem(.fixed(150)),GridItem(.fixed(150))]) {
                    ForEach(rainbowColors, id:\.self) { color in
                        Circle()
                        .fill(color)
                    }
                }
                .padding()
            }
we have:
Three columns of circles with fixed size but truncated.
GridItem Flexible
With flexible, we define the size of GridItem within a range. For example:
It’s helpful when we need different sizes for different content, such as images and text.
Let’s try the vertical case for exercise.
Note: English is not my native language, so I apologize for any errors. I use AI solely to generate the banner of the post; the content is human-generated.
First of all, we will create the view to edit a ProjectItem:
import SwiftUI
import SwiftData

struct EditProjectView: View {
    @Environment(\.modelContext) private var modelContext
    @Environment(\.dismiss) private var dismiss
    @Binding var project: ProjectItem?
    var edit = false

    var body: some View {
        VStack {
            Text(edit ? "Edit": "Create")
            TextField("Project name", text: Binding(
                get: { project?.name ?? "" },
                set: { newValue in project?.name = newValue }
            ))
            Button("Save") {
                if !edit {
                    modelContext.insert(project!)
                }
                try? modelContext.save()
                dismiss()
            }
        }
    }
}

#Preview {
    @State var dum: ProjectItem?
    return EditProjectView(project: $dum)
}
A part from the variable used to dismiss the sheet (considering that this view is displayed in a sheet), this view receives a project variable and an edit variable. If the edit variable is true, it means we are editing an existing item; otherwise, we are creating a new one. Considering this, change the save action to only save if it’s an edit; otherwise, also perform an insert.
The projectsView is now changed in this way:
struct ProjectsView: View {
    @Environment(\.modelContext) private var modelContext
    @Query private var projects: [ProjectItem]
    @State var isPresented = false
    @State var projectSelected: ProjectItem?
    @State var edit = false

    var body: some View {
        NavigationStack {
            List {
                ForEach(projects) { project in
                    HStack() {
                        Text(project.name)
                        Spacer()
                    }
                    .contentShape(Rectangle())
                    .onTapGesture {
                        projectSelected = project
                        edit = true
                        isPresented = true
                    }

                }.onDelete(perform: deleteProject)
            }
            .toolbar {
                ToolbarItem(placement: .navigationBarTrailing) {
                    EditButton()
                }
                ToolbarItem {
                    Button(action: {
                        projectSelected = ProjectItem(name: "")
                        edit = false
                        isPresented = true
                    }) {
                        Label("Add Project", systemImage: "plus")
                    }
                }
            }
            .sheet(isPresented: $isPresented) {
                EditProjectView(project: $projectSelected, edit: edit)
            }
        }
    }
    private func deleteProject(offsets: IndexSet) {
        withAnimation {
            for index in offsets {
                modelContext.delete(projects[index])
            }
        }
    }
}
So, if we tap on an existing project name, we’ll edit the selected project. Instead, if we tap on “Add,” a new project will be created and the edit view will be displayed in creation mode.
Simple query
Now, suppose that we want to display only the Pomodoros associated with the project named “test project”:
import SwiftUI
import SwiftData

struct PomodoriView: View {
    @Environment(\.modelContext) private var modelContext
    @Query(filter: #Predicate<PomodoroItem> { pomodoro in
        pomodoro.project.name == "test project"
    }) var pomodori: [PomodoroItem]
    @State var isPresented = false

    var body: some View {
        NavigationStack {
            List {
                ForEach(pomodori) { pomodoro in
                    Text(pomodoro.name)
                }.onDelete(perform: deletePomodoro)
            }
            .toolbar {
                ToolbarItem(placement: .navigationBarTrailing) {
                    EditButton()
                }
                ToolbarItem {
                    Button(action: {isPresented = true}) {
                        Label("Add Pomodoro", systemImage: "plus")
                    }
                }
            }.sheet(isPresented: $isPresented, content: {
                PomodoroView()
            })
        }
    }
    private func deletePomodoro(offsets: IndexSet) {
        withAnimation {
            for index in offsets {
                modelContext.delete(pomodori[index])
            }
        }
    }
}
The query is:
@Query(filter: #Predicate<PomodoroItem> { pomodoro in
        pomodoro.project.name == "test project"
    }) var pomodori: [PomodoroItem]
Simple, and we can also add more conditions, but statically. While this might be straightforward, it’s not always helpful. It’s better to have a dynamic query.
Dynamic Query
We have to create a view for the list, with the initializer where we execute the query:
struct ListFilteredView: View {
    @Environment(\.modelContext) private var modelContext
    @Query var pomodori: [PomodoroItem]
    var searchString = ""

    init(sort: SortDescriptor<PomodoroItem>, searchString: String) {
        _pomodori = Query(filter: #Predicate {
            if searchString.isEmpty {
                return true
            } else {
                return $0.project.name.contains(searchString)
            }
        }, sort: [sort])
    }
    var body: some View {
        List {
            ForEach(pomodori) { pomodoro in
                Text(pomodoro.name)
            }
        }
    }
}
So i nthe init the quesry is filtered. Note that we call pomodori with _pomodori, the backup property of the @Query.
The PomodoriView changes in this way:
struct PomodoriView: View {
    @Environment(\.modelContext) private var modelContext
    @Query var pomodori: [PomodoroItem]
    @State var searchString = ""

    var body: some View {
        NavigationStack {
            ListFilteredView(sort: SortDescriptor(\PomodoroItem.project.name), searchString: searchString)
            .searchable(text: $searchString)
        }
    }
    private func deletePomodoro(offsets: IndexSet) {
        withAnimation {
            for index in offsets {
                modelContext.delete(pomodori[index])
            }
        }
    }
}
Note that apart from passing the search string, we also pass the sort option, in this case sorting by the project name associated with the Pomodoro.
Note: English is not my native language, so I apologize for any errors. I use AI solely to generate the banner of the post; the content is human-generated.
In the previous episode, we learned how to create a project with SwiftData, how to create relationships between entities, and how to insert data. In this episode, we’ll learn: How to delete data.
Let’s start with deletion in the projects (I advise you to take a look at the previous episode because I will start from that code). The first step is to ensure that when we delete a project, we also delete all the pomodoros for that project in cascade. To do that, we need to make some small changes to the ProjectItem definition.
import Foundation
import SwiftData

@Model
final class ProjectItem: Identifiable {
    var name: String
    var id = UUID().uuidString

    @Relationship(deleteRule: .cascade, inverse: \PomodoroItem.project)
    var pomodori = [PomodoroItem]()

    init(name: String) {
        self.name = name
    }
}
We add a @Relationship attribute for the deletion on the list of pomodoros associated with the project. The deletion will be in cascade, considering the inverse relationship that we have in the PomodoroItem (where we have project: ProjectItem) as you can see in the code:
import Foundation
import SwiftData

@Model
final class PomodoroItem {
    var start: Date
    var end: Date
    var project: ProjectItem
    var name: String

    init(start: Date, end: Date, project: ProjectItem, name: String) {
        self.start = start
        self.end = end
        self.project = project
        self.name = name
    }
}
Now take a look at the ProjectsView:
import SwiftUI
import SwiftData

struct ProjectsView: View {
    @Environment(\.modelContext) private var modelContext
    @Query private var projects: [ProjectItem]

    var body: some View {
        NavigationStack {
            List {
                ForEach(projects) { project in
                    Text(project.name)
                }.onDelete(perform: deleteProject)
            }
            .toolbar {
                ToolbarItem {
                    Button(action: {isPresented = true}) {
                        Label("Add Project", systemImage: "plus")
                    }

                ToolbarItem(placement: .navigationBarTrailing) {
                    EditButton()
                }
            }.sheet(isPresented: $isPresented, content: {
                ProjectView()
            })
        }
    }
    private func deleteProject(offsets: IndexSet) {
        withAnimation {
            for index in offsets {
                modelContext.delete(projects[index])
            }
        }
    }
}
We added an EditButton to the toolbar (one of the special buttons in SwiftUI). Tapping on this button will display the buttons to delete the rows. When you tap on one of these buttons, the deleteProjectFunction is called to delete the project.
The view for the pomodoros is similar:
struct PomodoriView: View {
    @Environment(\.modelContext) private var modelContext
    @Query private var pomodori: [PomodoroItem]
    @State var isPresented = false

    var body: some View {
        NavigationStack {
            List {
                ForEach(pomodori) { pomodoro in
                    Text(pomodoro.name)
                }.onDelete(perform: deletePomodoro)
            }
            .toolbar {
                ToolbarItem(placement: .navigationBarTrailing) {
                    EditButton()
                }
                ToolbarItem {
                    Button(action: {isPresented = true}) {
                        Label("Add Pomodoro", systemImage: "plus")
                    }
                }
            }.sheet(isPresented: $isPresented, content: {
                PomodoroView()
            })
        }
    }
    private func deletePomodoro(offsets: IndexSet) {
        withAnimation {
            for index in offsets {
                modelContext.delete(pomodori[index])
            }
        }
    }
}
This tutorial may seem short, but I encourage you to experiment with deletion and relationships. In the next episode, we will see how to update items and create queries.
With this post, a short series about SwiftData begins. The goal of this tutorial is to learn SwiftData by building a Pomodoro app (we’ll be using code from another one of my tutorials). SwiftData replaces CoreData, and I can say that CoreData is a pain for any iOS developer. With SwiftData, things are much simpler. Enough with the introduction, let’s start.
In this post, we’ll cover:
How to create a project with SwiftData
How to create entities
How to create relations between entities
How to display data
How to insert data
How do you create a project that needs SwiftData? Simply take a look at the screenshot:
So, in the storage section, choose SwiftData. This will automatically add the necessary code to your …App file. You should have something like this:
import SwiftUI
import SwiftData

@main
struct SavePomodoroAppApp: App {
    var sharedModelContainer: ModelContainer = {
        let schema = Schema([
            Item.self,
        ])
        let modelConfiguration = ModelConfiguration(schema: schema, isStoredInMemoryOnly: false)

        do {
            return try ModelContainer(for: schema, configurations: [modelConfiguration])
        } catch {
            fatalError("Could not create ModelContainer: \(error)")
        }
    }()

    var body: some Scene {
        WindowGroup {
            ContentView()
        }
        .modelContainer(sharedModelContainer)
    }
}
The sharedModelContainer is the ModelContainer that is created considering the schema and the configuration. Note that in the configuration, it is possible to define whether we want to store the data only in memory or not.
How do you create an entity? Use the keyword model:
import Foundation
import SwiftData

@Model
final class ProjectItem: Identifiable {
    var name: String
    var id = UUID().uuidString
    init(name: String) {
        self.name = name
    }
}
In this case, we want to create an entity Project that has a name and a UUID identifier (for this reason, we specify the protocol Identifiable).
Now, how do we create relations between entities? Suppose we want an entity Pomodoro where every pomodoro has a project:
import Foundation
import SwiftData

@Model
final class PomodoroItem {
    var start: Date
    var end: Date
    var project: ProjectItem
    var name: String

    init(start: Date, end: Date, project: ProjectItem, name: String) {
        self.start = start
        self.end = end
        self.project = project
        self.name = name
    }
}
Simply, we add a variable project of type ProjectItem.
So, two tabs: one for Pomodoro and another for Projects.
Take a look at the PomodoriView to see how to display data:
import SwiftUI
import SwiftData

struct PomodoriView: View {
    @Query private var pomodori: [PomodoroItem]
    @State var isPresented = false

    var body: some View {
        NavigationStack {
            List {
                ForEach(pomodori) { pomodoro in
                    Text(pomodoro.name)
                }
            }
            .toolbar {
                ToolbarItem {
                    Button(action: {isPresented = true}) {
                        Label("Add Pomodoro", systemImage: "plus")
                    }
                }
            }.sheet(isPresented: $isPresented, content: {
                PomodoroView()
            })
        }
    }
}
So, with the Query, we load all the PomodoroItem and display them in a list.
The view for the projects is similar:
struct ProjectsView: View {
    @Query private var projects: [ProjectItem]
    @State var isPresented = false

    var body: some View {
        NavigationStack {
            List {
                ForEach(projects) { project in
                    Text(project.name)

                }
            }
            .toolbar {
                ToolbarItem {
                    Button(action: {isPresented = true}) {
                        Label("Add Project", systemImage: "plus")
                    }
                }
            }.sheet(isPresented: $isPresented, content: {
                ProjectView()
            })
        }
    }
}
Both of these views have an add button. By tapping on it, we can insert a project or a pomodoro. Take a look at the project:
import SwiftUI
import SwiftData

struct ProjectView: View {
    @Environment(\.modelContext) private var modelContext
    @Environment(\.dismiss) private var dismiss
    @State var projectName = ""

    var body: some View {
        VStack {
            TextField("Project name", text: $projectName)
            Button("Save") {
                let newProject = ProjectItem(name: projectName);
                modelContext.insert(newProject)
                dismiss()
            }

        }.padding()
    }
}
In this view, we declare an environment to call the modelContext to operate on the data and the dismiss to close the sheet.
In the action of the save button, we create a ProjectItem with a name and save it.
The process to create a pomodoro is a bit different:
import SwiftUI
import SwiftData

struct PomodoroView: View {
    @Environment(\.modelContext) private var modelContext
    @Environment(\.dismiss) private var dismiss
    @Query private var projects: [ProjectItem]
    @State var selectedProject: ProjectItem?
    @State var pomodoroName: String = ""

    var body: some View {
        VStack {
            Picker("Please choose a project", selection: $selectedProject) {
                            ForEach(projects) { project in
                                Text(project.name)
                                    .tag(Optional(project))
                            }
                        }
            TextField("Pomodoro name", text: $pomodoroName)
            Button("Start") {
                let pomodoro = PomodoroItem(start: Date(), end: Date(), project: selectedProject!, name: pomodoroName)
                modelContext.insert(pomodoro)
                dismiss()
            }
        }
    }
}
In this case, considering that every pomodoro has a project, we load all the projects and display the project names using a picker. Please note that in the picker, we use the tag with Optional (because we can select nothing). If we omit this, we get an error: “Picker: the selection ‘nil’ is invalid and does not have an associated tag, this will give undefined results.” If you tap on the picker, nothing happens.
For now, the start button doesn’t start anything, but we simply save the pomodoro by assigning a project name and the current date.
Note: English is not my native language, so I apologize for any errors. I use AI solely to generate the banner of the post; the content is human-generated.
Manage Consent
To provide the best experiences, we use technologies like cookies to store and/or access device information. Consenting to these technologies will allow us to process data such as browsing behavior or unique IDs on this site. Not consenting or withdrawing consent, may adversely affect certain features and functions.
Functional
Always active
The technical storage or access is strictly necessary for the legitimate purpose of enabling the use of a specific service explicitly requested by the subscriber or user, or for the sole purpose of carrying out the transmission of a communication over an electronic communications network.
Preferences
The technical storage or access is necessary for the legitimate purpose of storing preferences that are not requested by the subscriber or user.
Statistics
The technical storage or access that is used exclusively for statistical purposes.The technical storage or access that is used exclusively for anonymous statistical purposes. Without a subpoena, voluntary compliance on the part of your Internet Service Provider, or additional records from a third party, information stored or retrieved for this purpose alone cannot usually be used to identify you.
Marketing
The technical storage or access is required to create user profiles to send advertising, or to track the user on a website or across several websites for similar marketing purposes.