I'm a software engineer who adds to the passion for technologies the wisdom and the experience without losing the wonder for the world. I love to create new projects and to help people and teams to improve.
Today, we often see complex interfaces built using carousel components, as seen on Netflix, Amazon, and others. In this post, I will show you how to build one using SwiftUI. Let’s get started.
First, I’ll show you an example of a carousel built using only text and a rectangle. This is a minimal example meant to help you understand the fundamentals. Then, in the second example, I’ll add some images.
As usual, let’s start from the end.
It’s possible to scroll any row horizontally and vertically.
The code:
struct ContentView: View {
    var colorsRow: [Color] = [.purple,.yellow]
    var body: some View {
        ScrollView {
            VStack(spacing: 5) {
                ForEach(0..<10) { j in
                    ScrollView(.horizontal) {
                        HStack(spacing: 5) {
                            ForEach(0..<10) { i in
                                VStack {
                                    Text("Item \(i)")
                                        .foregroundColor(colorsRow[j % 2])
                                        .font(.largeTitle)
                                        .frame(width: 200, height: 200)
                                        .background(.black)

                                }.cornerRadius(20)
                            }
                        }
                    }
                }
            }.background(.black)
                .opacity(0.9)
        }.edgesIgnoringSafeArea(.all)
    }
}
We use two ScrollViews for this implementation: the first for vertical scroll (default behavior) and the second for horizontal scrolling. Note the “.horizontal” parameter. In the VStack, we specify the spacing, which is the space between rows. In the HStack, the spacing is the space between columns.
The first ForEach loop is for rows, and the second is for columns. The color of the text is chosen using the modulo of the row.
Finally, we added a bit of opacity for a better Look and Feel.
Note: English is not my native language, so I’m sorry for some errors. I appreciate it if you correct me.
In XCode 14 we have some changes that can help the developers. The main things are in the canvas (UI preview).
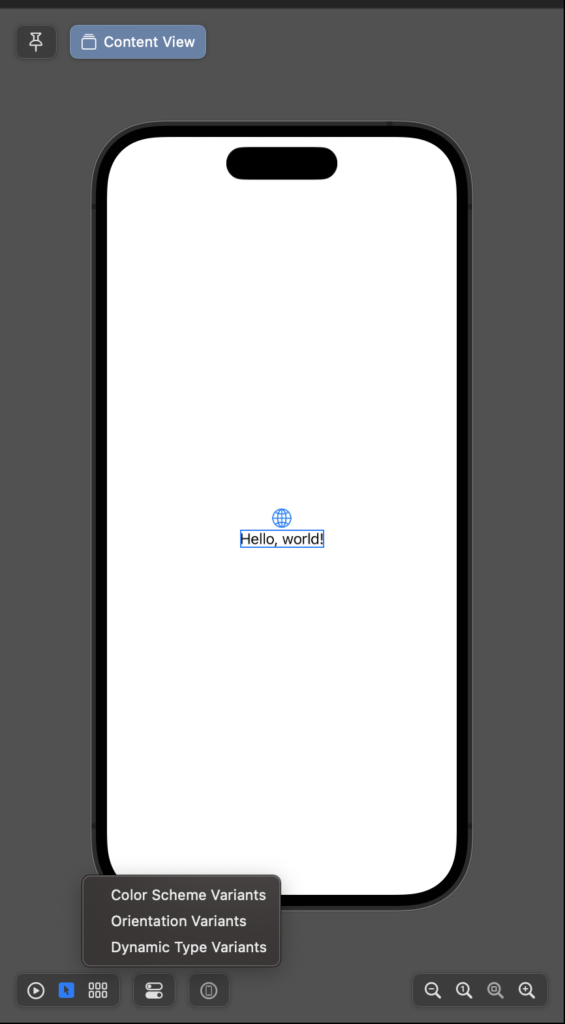
The button1 only changed the position, it’s to run the preview. Clicking the button2 it’s possible to select the single element on the canvas. With the button3, see:
So, with this context menu is possible to see the view with the different colour schema (light/dark) in the different orientations and sizes. Clicking the button4 it’s set the property of the device in the canvas (colour schema, orientation and size). Last but not least, with button5 the preview is executed on the real device connected to the computer.
The pin button
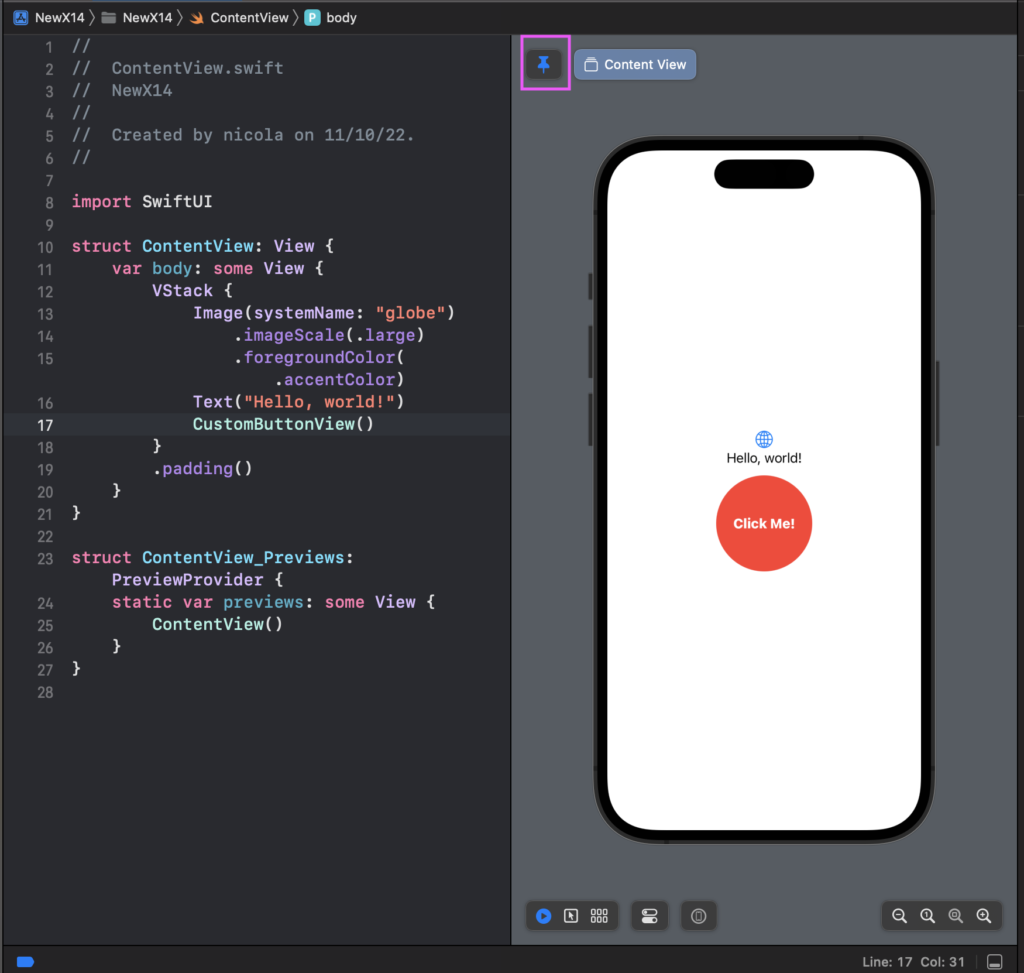
Often happen that the views are complex and composed of different elements. In that case, you can like see the complete view and change a property of a single component and see in real-time what happens in the complete view, now it’s possible without switching between the whole view and the single component, using the pin button. Let’s create a new project, we want to add only a custom button defined in a different view file:
Now we want to change the button’s colour but see in real-time what happens in the ContentView. Select the ContentView and click the pin button (purple box):
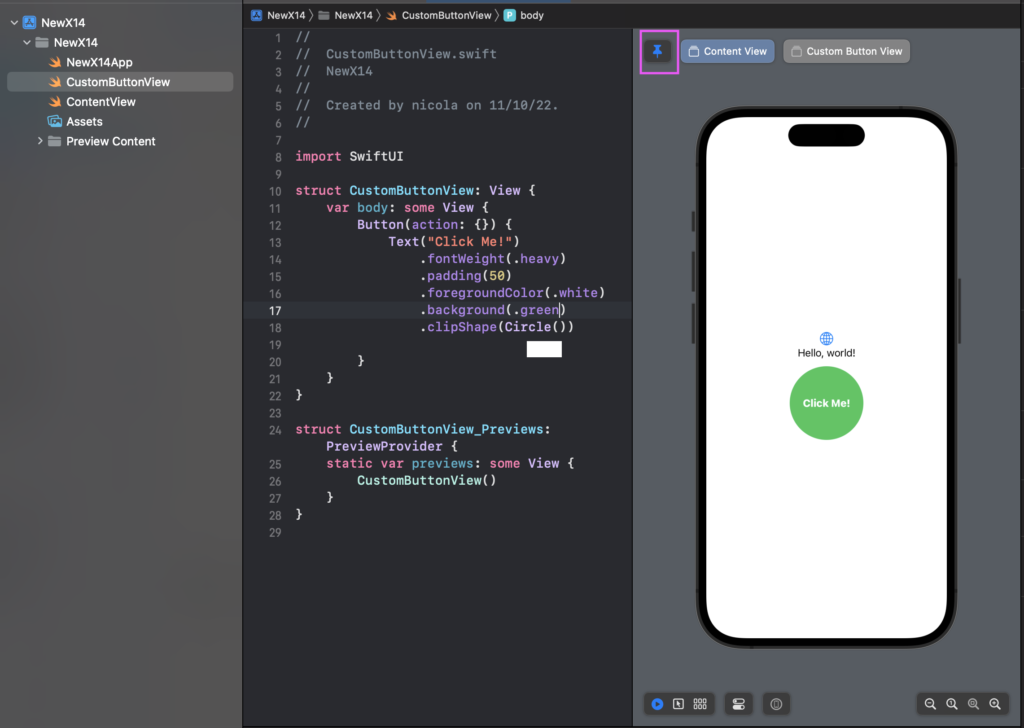
Now select the CustomButtonView in the files project list, so we see the code of the custom button in the preview but we see the “pinned” view, the ContentView.
We can change the colour and see what happens in the ContentView. (If you want, you can get the code from https://github.com/niqt/NewX14
AnyLayout
With the last release of SwiftUI is now possible to swap automatically from the different Layout, Horizontal and Vertical. Now we have HStackLayout and VStackLayout can be used to choose the layout following the orientation.
struct ContentView: View {
    @Environment(\.horizontalSizeClass) var horizontalSizeClass

    var body: some View {
        var layout = (horizontalSizeClass == .regular) ? AnyLayout(HStackLayout()) : AnyLayout(VStackLayout())
        layout {
                Image(systemName: "globe")
                    .imageScale(.large)
                    .foregroundColor(.accentColor)
                Image(systemName: "car")
                    .imageScale(.large)
                    .foregroundColor(.accentColor)
                Image(systemName: "pencil")
                    .imageScale(.large)
                    .foregroundColor(.accentColor)

        }


    }
}
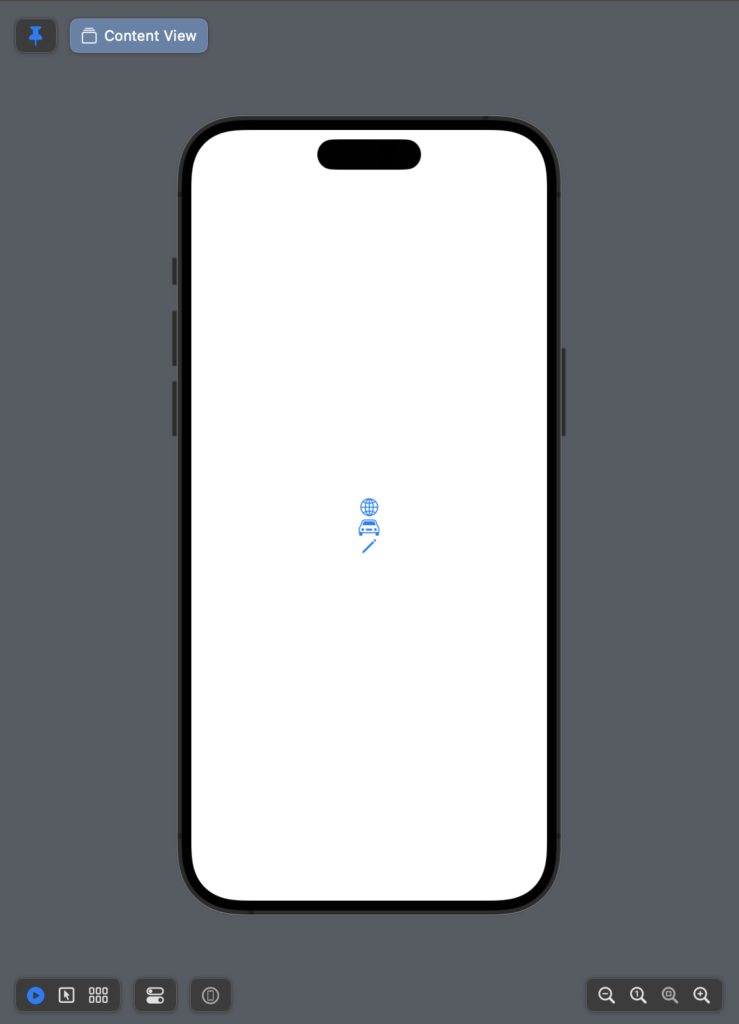
With the horizontalSizeClass we can know the orientation of the device and select the layout that we want.
The image speaks more than one thousand words:
Thus, use VStackLayout and HStackLayout when you need to change the layout dynamically in other cases use HStack and VStack.
Note: English is not my native language, so I’m sorry for some errors. I appreciate it if you correct me.
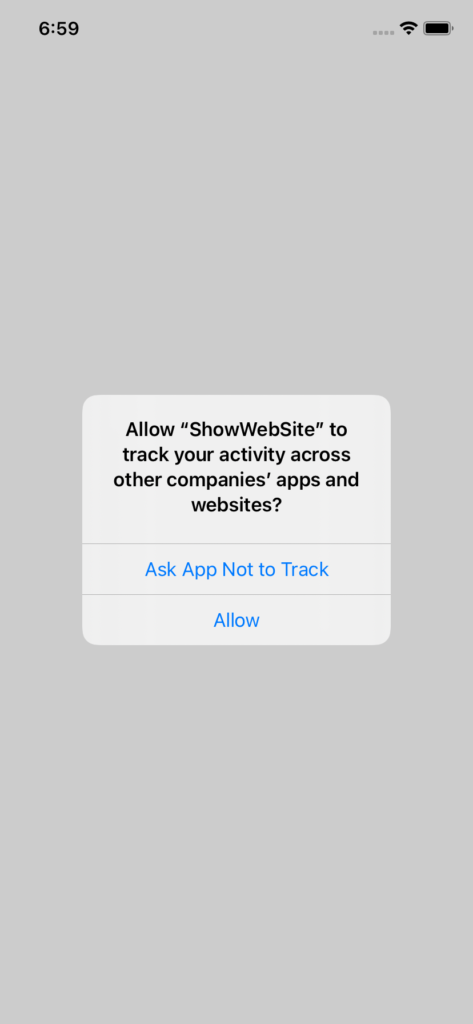
In this post we’ll see how implement what iOS require for the tracking and i’ll use this example also to explain other concepts.
Let’s start from the end, we want this:
Swift with Storyboard
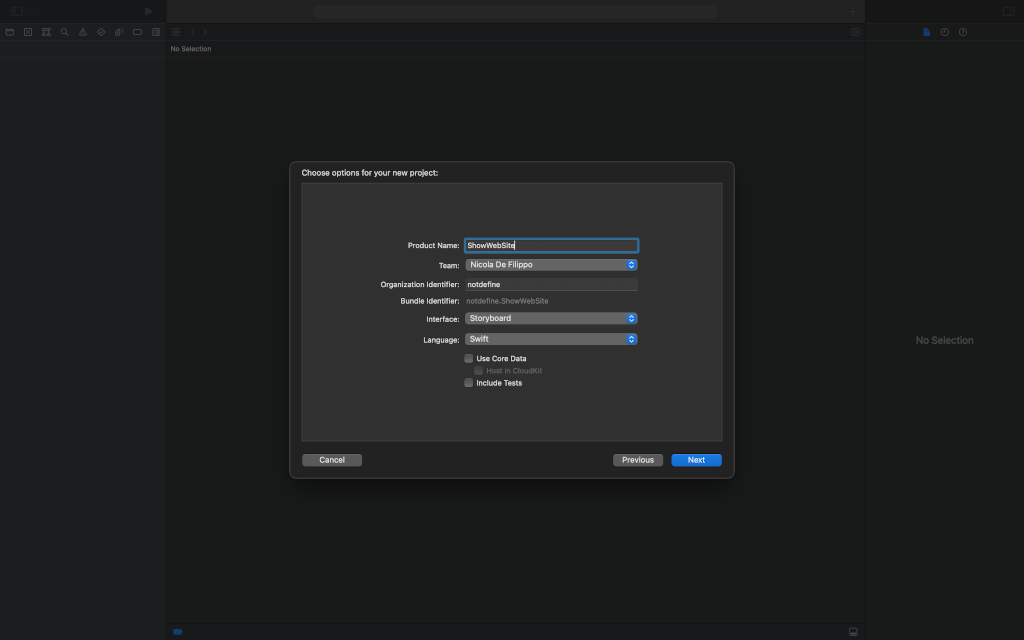
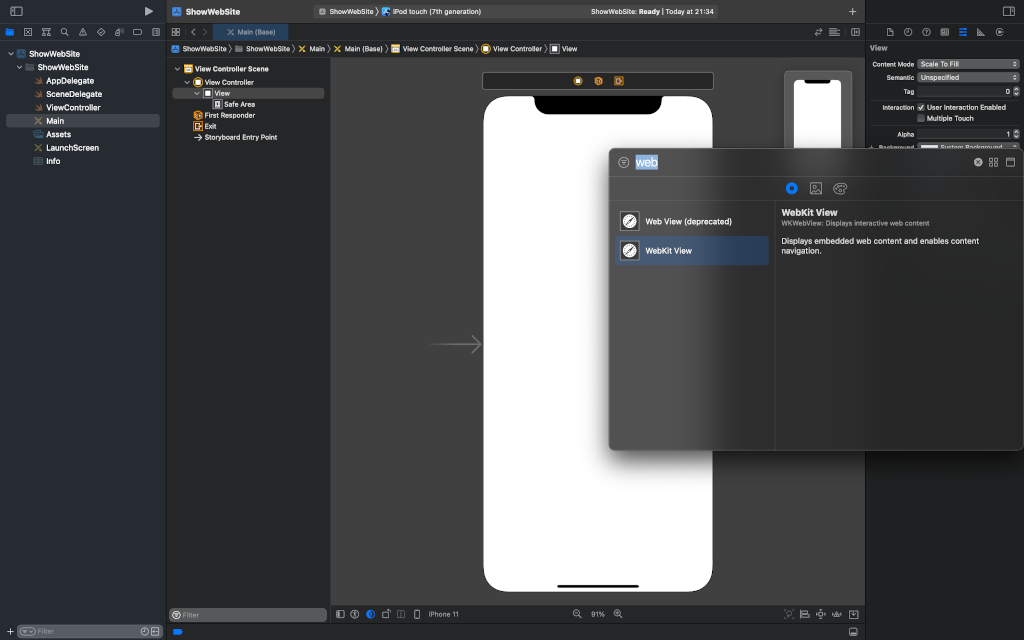
Create a iOS project using a storyboard:
Create project
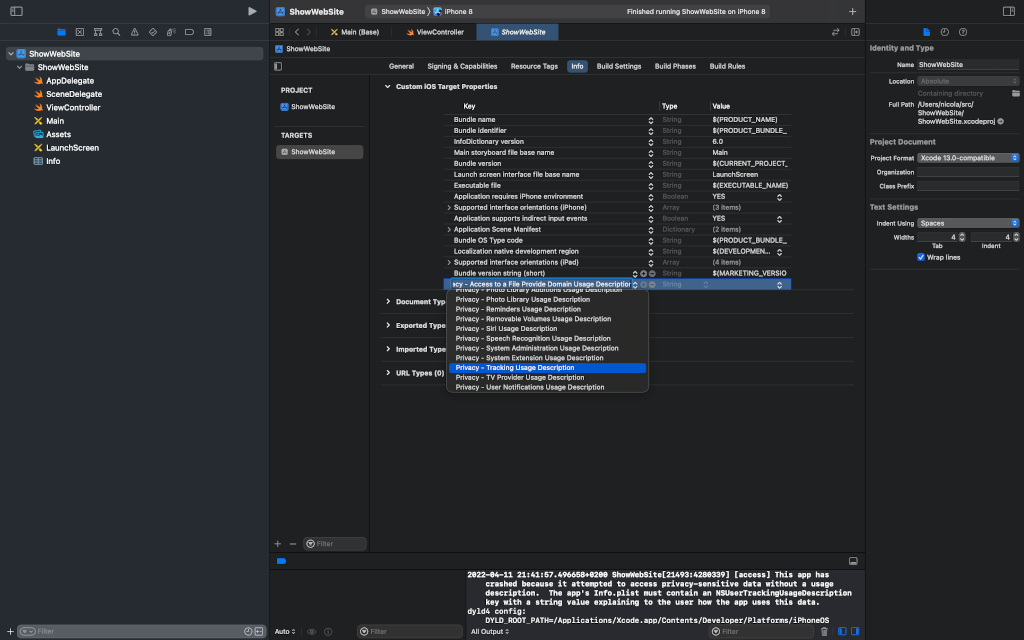
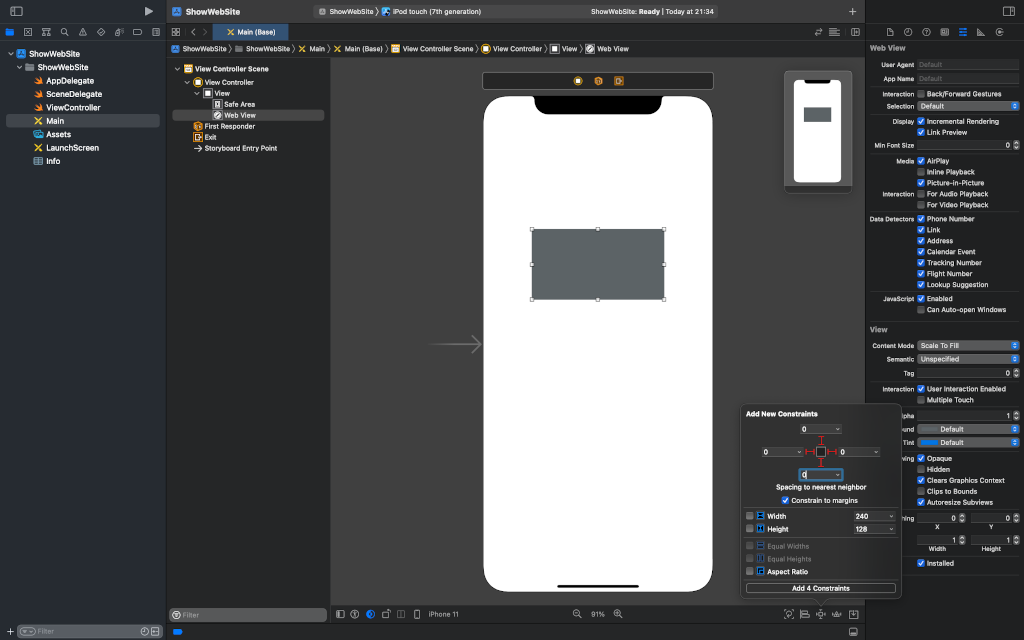
After that, we add a WebView to the storyboard and apply the constrains to have the webview in full-screen. We must add a string value for the “Privacy – Tracking Description usage” in the info tab. This message have to explain because the user is tracked.
First add an outlet for the webview:
import UIKit
import WebKit

class ViewController: UIViewController {

    @IBOutlet weak var webView: WKWebView!
    override func viewDidLoad() {
        super.viewDidLoad()
    }
}
We have to add the import for the Tracking API in the SceneDelegate.swift:
func sceneDidBecomeActive(_ scene: UIScene) {
// Called when the scene has moved from an inactive state to an active state.
// Use this method to restart any tasks that were paused (or not yet started) when the scene was inactive.
attRequest()
}
func attRequest() {
RequestManager.checkTrackingStatus { status in
switch status {
case .authorized:
print("Authorized")
case .denied:
print("Denied")
case .notDetermined:
print("NotDetermined")
self.attRequest()
case .restricted:
print("Restricted")
@unknown default:
break
}
}
}
In the sceneDidBecomeActive call the our function attRequest; this function call checkTrackingStatus with a closure, this function gets the status, if the status is notDetermined, the function call itself to re-ask the authorization. Note that we get also the IDFA but in our case we don’t use it.
How have this using SwiftUI? More simple, add always the string in the plist.info to request the permission and in the code write:
import SwiftUI
import AdSupport
import AppTrackingTransparency
struct ContentView: View {
var body: some View {
VStack {
Text("Got the permission!")
}.onReceive(NotificationCenter.default.publisher(for: UIApplication.didBecomeActiveNotification)) { _ in
ATTrackingManager.requestTrackingAuthorization(completionHandler: { status in
switch status {
case .authorized:
print("A")
case .denied:
print("D")
case .notDetermined:
print("E")
case .restricted:
print(" restricted")
@unknown default:
break
}
})
}
}
}
In this case the view require the tracking authorization calling the ATTrackingManager in the onReceive of the VStack (just for example). That’s all.
Note: English is not my native language, so I’m sorry for some errors. I appreciate it if you correct me.
Proceed for step: the things to do are: check if the Bluetooth is enabled, scan to search the devices, connect with one and wait for data. The check of the Bluetooth status and the connection is a feature of the connection manager, the others of the peripheral. Let’s see it in details.
Every device has a service, identified with a UUID and any service can have one more property. The properties can be read-only (to read value) or read-write (write is like send a command). Also, the properties are identified with a UUID.
Let’s look at the code:
import Foundation
import CoreBluetooth
Then define the peripherical struct:
struct Peripheral: Identifiable {
    let id: Int
    let name: String
    let rssi: Int
}
We use this struct to expose the peripherical to SwiftUI.
Now, start to look at the core of the application:
class BLEManager: NSObject, ObservableObject, CBCentralManagerDelegate, CBPeripheralDelegate {
    var centralBE: CBCentralManager!
    @Published var isSwitchedOn = false
    @Published var peripherals = [Peripheral]()
    var peripheralsId = [UUID]()
    var thermometer: CBPeripheral!
    var serviceId = CBUUID(string: "00000001-710e-4a5b-8d75-3e5b444b3c3f")
    var readNotify = CBUUID(string: "00000002-710e-4a5b-8d75-3e5b444b3c3f")
    var readWrite = CBUUID(string: "00000003-710e-4a5b-8d75-3e5b444b3c3f")
The BLEManger is an NSObject that is observable (from the SwiftUI side) and implements the protocols to manage the Bluetooth status and services. Instead, the CBPeripheralDelegate protocol it’s about peripherical and properties operation.
So, the CBCentralManager is the Bluetooth manager. The isSwitchedOn contains the status of the Bluetooth and the peripherals array contains the list of the peripherals. These last two variables are published, so the value can be get from SwiftUI.
The thermometer peripheral contains the data of the peripheral on that we want to work in this example, the temperature of a RaspberryPI (the code is here https://github.com/Douglas6/cputemp). Thus, with our app, we want to read the CPU temp of a raspberry. The serviceId and properties are from this Raspberry example, you are free to replace them with anything you want.
With the init, simply initialize the manager and the delegate:
After the scanning is started, with this function it’s possible to see the device around us:
func centralManager(_ central: CBCentralManager, didDiscover peripheral: CBPeripheral, advertisementData: [String : Any], rssi RSSI: NSNumber) {
        var peripheralName: String!

        if let name = advertisementData[CBAdvertisementDataLocalNameKey] as? String {
            peripheralName = name
            let newPeripheral = Peripheral(id: peripherals.count, name: peripheralName, rssi: RSSI.intValue)
            if !peripheralsId.contains(peripheral.identifier) && peripheralName == "Thermometer" {
                peripheralsId.append(peripheral.identifier)
                peripherals.append(newPeripheral)
                stopScanning()
                self.thermometer = peripheral
                self.thermometer.delegate = self
                self.centralBE.connect(peripheral, options: nil)
            }
        }
        else {
            peripheralName = "Unknown"
        }
    }
If the Thermometer peripheral is discovered, it’s added the the array of peripheral, the scanning is stopped, set the delegate for the peripheral to the self and to simplify connect to device (without user interaction).
If the connection has success, this function is called:
In the BLEManger.swift file you can see also other two lines functions, their name are. self-explanatory.
Take a look to the SwiftUI code:
struct ContentView: View {
    @ObservedObject var bleManager = BLEManager()
    @State private var scan = false

    var body: some View {
        VStack (spacing: 10) {
            Text("STATUS")
                .font(.headline)

            if bleManager.isSwitchedOn {
                Text("ON")
                    .foregroundColor(.green)
            }
            else {
                Text("OFF")
                    .foregroundColor(.red)
            }
            HStack {
                Spacer()
                Toggle("Scan", isOn: $scan)
                    .toggleStyle(SwitchToggleStyle(tint: .red))
                    .onChange(of: scan) { value in
                        // action...
                        self.bleManager.startScanning()
                    }

            }
            Text("Bluetooth Devices")
                .font(.largeTitle)
                .frame(maxWidth: .infinity, alignment: .center)
            List(bleManager.peripherals) { peripheral in
                HStack {
                    Text(peripheral.name)
                    Spacer()
                    Text(String(peripheral.rssi))
                }
            }.frame(height: 300)
            Spacer()
        }
    }
}
We can define an observable object, the BLEManager, so we can get the Bluetooth status, with the toggle button active the scan and in the end, show the peripheral list in a SwiftUI list. Enjoy with your peripheral!
The result
Note: English is not my native language, so I’m sorry for some errors. I appreciate it if your correct me.
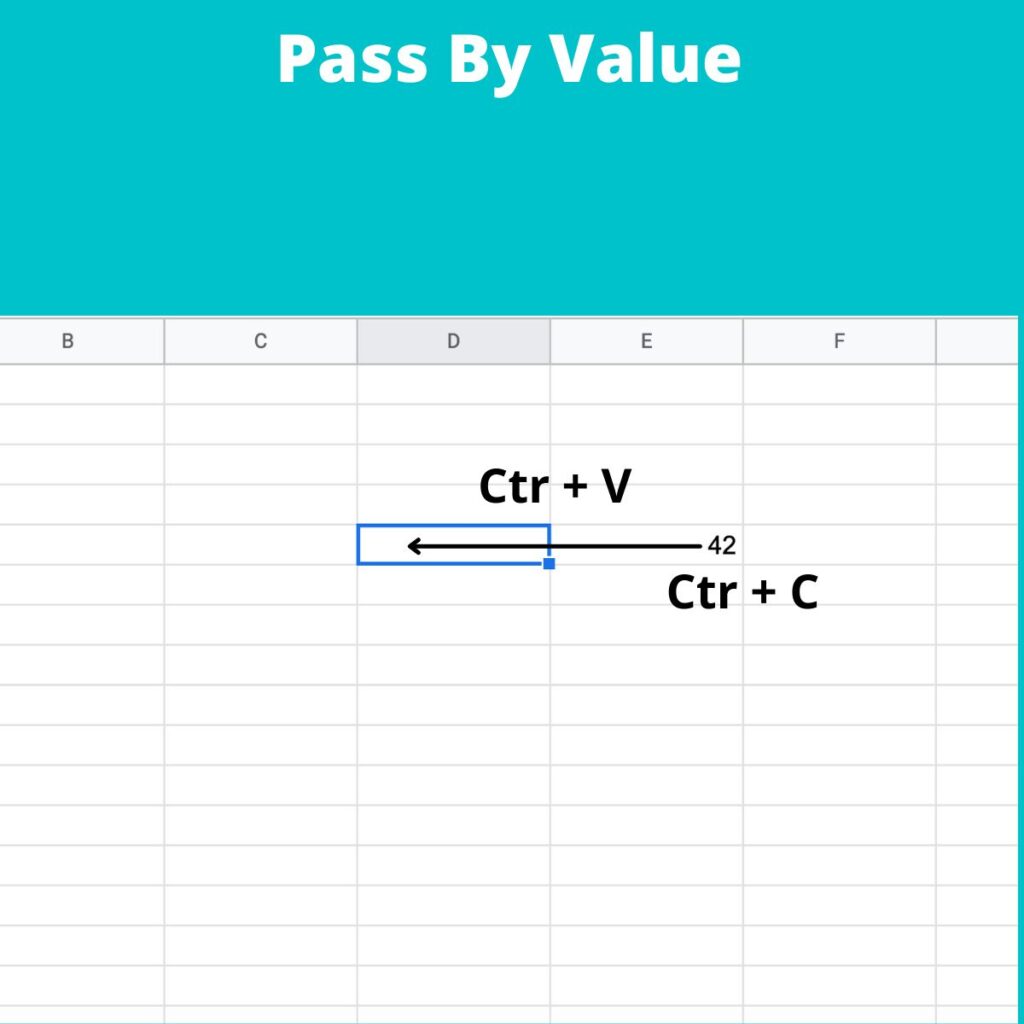
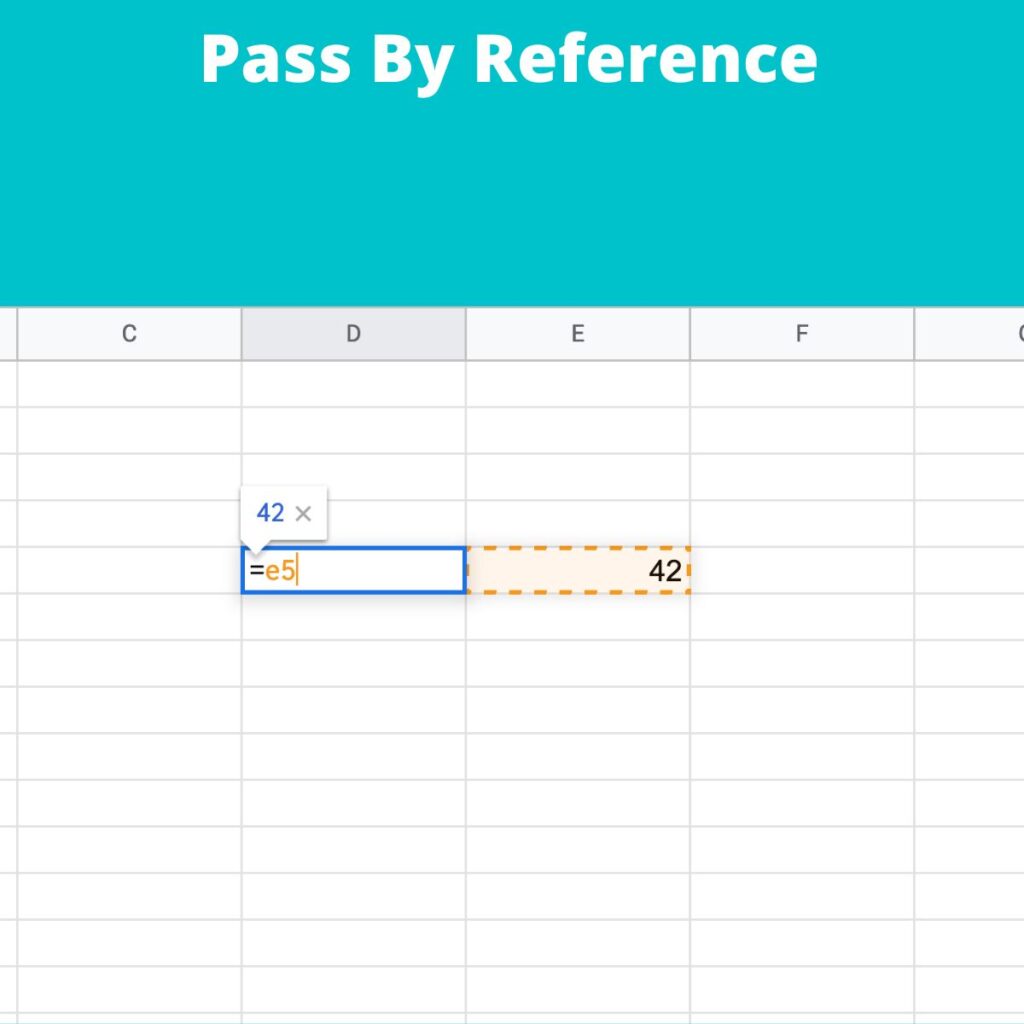
A concept not simple to understand in every programming language (mainly for the “new” developer) is to realize the difference between “Pass by reference and Pass by value”.
Pass by value means: “copy a value from a location of memory to another location of the memory.” Instead, pass by reference mean that we don’t copy a value in the destination but the reference (address) to the source.
I like to use these images to explain the differences:
Pass by ValuePass by reference
Thus, when we pass by value is like copying a cell value from one cell to another, instead, when passing by reference, we set in the destination cell the address of the source (e5 in the example).
Little box: width 57 height 84
Big box: width 57 height 84
Little box: width 57 height 84
Big box: width 150 height 333
In this case, we have a copy by value. We copy the content from bigBox to littleBox, thus both the boxes have the same value; after we change the value of bigBox and then the two boxes will contain different values.
Let’s see what happen with the class:
class TriangleClass {
    var width: Int
    var height: Int

    init(width: Int, height: Int) {
        self.width = width
        self.height = height
    }
}

var littleTriangle = TriangleClass(width: 2, height: 3)
var bigTriangle = TriangleClass(width: 57, height: 84)

littleTriangle = bigTriangle

print("Little Triangle: width \(littleTriangle.width) height \(littleTriangle.height)")
print("Big Triangle: width \(bigTriangle.width) height \(bigTriangle.height)")

bigTriangle.width = 150
bigTriangle.height = 333

print("Little Triangle: width \(littleTriangle.width) height \(littleTriangle.height)")
print("Big Triangle: width \(bigTriangle.width) height \(bigTriangle.height)")
Now we have this output:
Little Triangle: width 57 height 84
Big Triangle: width 57 height 84
Little Triangle: width 150 height 333
Big Triangle: width 150 height 333
This time is different! After the copy, the triangles have the same value; after we change the dimensions of the bigTriangle but happen a magic thing, the dimensions of the littleTriangle are changed! Why? For the class, the copy is done by reference, so writing “littleTrianlge = bigTriangle”, we are not copying the content of the big in the little, we are copying the reference like in the sheet example. Now every change in the big will be visible also in the little.
The same happen in the function, if we want modify the original value of the parameter passed to a function, these have be passed by reference, in this way:
func swap(a : inout Int, b: inout Int) {
    let dum = a
    a = b
    b = dum
}

var first = 2
var second = 5

swap(a:&first, b:&second)

// now first = 5 and second = 2
For exercise try to remove the keyword “inout” and see what happen.
Manage Consent
To provide the best experiences, we use technologies like cookies to store and/or access device information. Consenting to these technologies will allow us to process data such as browsing behavior or unique IDs on this site. Not consenting or withdrawing consent, may adversely affect certain features and functions.
Functional
Always active
The technical storage or access is strictly necessary for the legitimate purpose of enabling the use of a specific service explicitly requested by the subscriber or user, or for the sole purpose of carrying out the transmission of a communication over an electronic communications network.
Preferences
The technical storage or access is necessary for the legitimate purpose of storing preferences that are not requested by the subscriber or user.
Statistics
The technical storage or access that is used exclusively for statistical purposes.The technical storage or access that is used exclusively for anonymous statistical purposes. Without a subpoena, voluntary compliance on the part of your Internet Service Provider, or additional records from a third party, information stored or retrieved for this purpose alone cannot usually be used to identify you.
Marketing
The technical storage or access is required to create user profiles to send advertising, or to track the user on a website or across several websites for similar marketing purposes.