I'm a software engineer who adds to the passion for technologies the wisdom and the experience without losing the wonder for the world. I love to create new projects and to help people and teams to improve.
Before starting to use Swift to build embedded software, it is essential to install the native SDK for the Raspberry Pico so that we have a basic toolchain installed. In the next post, we’ll see how to use Swift.
In this post we’ll learn how to:
Install the Pico SDK
Run a native example
Install the Pico SDK
First step:
cd ~
mkdir pico
cd pico
Second step:
git clone -b master https://github.com/raspberrypi/pico-sdk.git

# Set the PICO_SDK_PATH environment variable to where you just cloned the repo.
export PICO_SDK_PATH=/path/to/pico-sdk

cd pico-sdk
git submodule update --init
cd ..
git clone -b master https://github.com/raspberrypi/pico-examples.git
Third step:
# Install cmake
brew install cmake

# Install the arm eabi toolchain
brew install --cask gcc-arm-embedded

xcode-select --install
Create a directory for the project, in this directory create this main.c
#include <stdio.h>
#include "pico/stdlib.h"
int main() {
const uint led_pin = 25;
// Initialize LED pin
gpio_init(led_pin);
gpio_set_dir(led_pin, GPIO_OUT);
// Initialize chosen serial port
stdio_init_all();
// Loop forever
while (true) {
// Blink LED
printf("Blinking!\r\n");
gpio_put(led_pin, true);
sleep_ms(1000);
gpio_put(led_pin, false);
sleep_ms(1000);
}
}
Now the CMakeLists.txt
# Set minimum required version of CMake
cmake_minimum_required(VERSION 3.12)
# Include build functions from Pico SDK
include($ENV{PICO_SDK_PATH}/external/pico_sdk_import.cmake)
# Set name of project (as PROJECT_NAME) and C/C standards
project(blink C CXX ASM)
set(CMAKE_C_STANDARD 11)
set(CMAKE_CXX_STANDARD 17)
# Creates a pico-sdk subdirectory in our project for the libraries
pico_sdk_init()
# Tell CMake where to find the executable source file
add_executable(${PROJECT_NAME}
main.c
)
# Create map/bin/hex/uf2 files
pico_add_extra_outputs(${PROJECT_NAME})
# Link to pico_stdlib (gpio, time, etc. functions)
target_link_libraries(${PROJECT_NAME}
pico_stdlib
)
# Enable usb output, disable uart output
pico_enable_stdio_usb(${PROJECT_NAME} 1)
pico_enable_stdio_uart(${PROJECT_NAME} 0)
To compile:
mkdir build
cd build
cmake ..
make
After that, we should have the file blink.uf2 in the build directory. Connect your Pico to the computer, open it like a pendrive, and copy the file. Reboot the Pico; it should now blink.
I want to suggest this book: “Fundamentals of Software Architecture: An Engineering Approach” (https://tinyurl.com/35ewyab4) for both newbies and expert engineers. What do I like about this book?
Very clear about the architecture properties.
For every architecture, at the end of the chapter, we find a card with the strengths and weaknesses.
Advice for tools (drawing and other).
Considers the soft skills for an architect, such as how to communicate with each other (for example, how to write an email to communicate an architectural decision). It puts humans at the center, not just the technology.
In this post, we’ll see how to share data from the application to the widget.
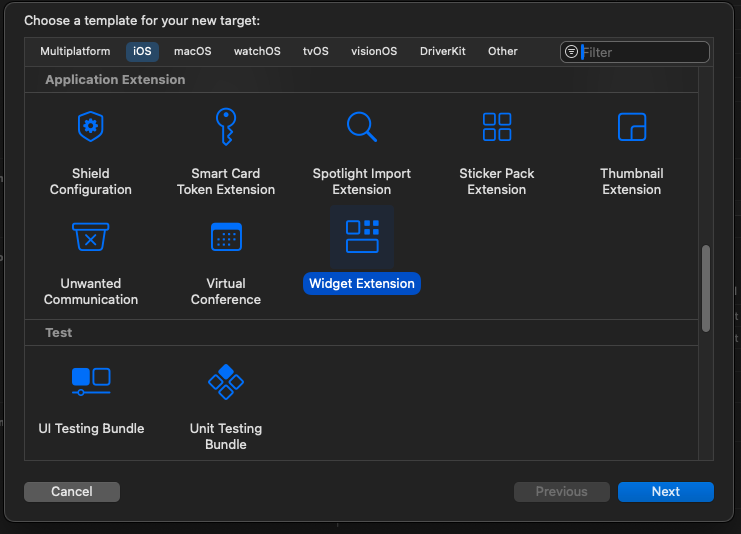
First, create the project and call it SharedWidget, selecting SwiftData as storage. After that, create the widget by selecting Target in the File -> New menu and then WidgetExtension.
After the creation process, you can also deselect the Live and Intent options because we won’t be using them.
To share data between the application and the widget, we need to create an App Group in the capabilities. After that, add a group and call it whatever you want. In my case, I named it:
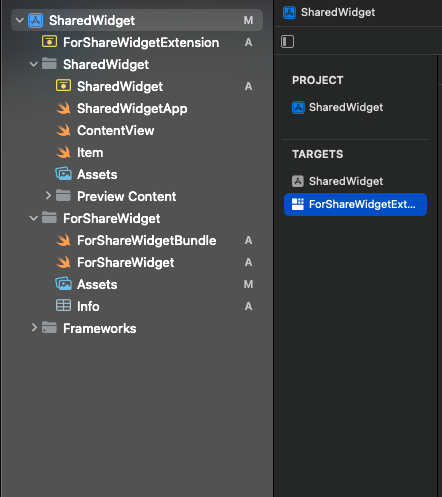
Then, select the widget extension in the target:
Thus, also for it, add the app group in the capabilities, but this time don’t add a new one; select the existing one.
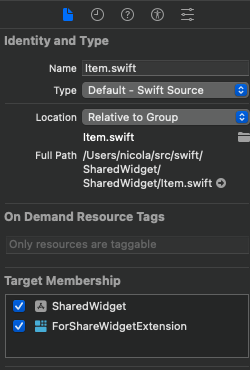
One last thing before we look at the code. We have to share the model between the app and the widget, so select the Item.swift file and select both project components:
If you run the application at this moment, you can add an item (the default Apple example for SwiftData) and if you add the widget, you’ll see a time and an emoji. We want to simply display the number of items added below the emoji, so the first thing to do is:
struct SimpleEntry: TimelineEntry {
    let date: Date
    let emoji: String
    let number: Int
}
Where the TimeLineEntry is: “A type that specifies the date to display a widget, and, optionally, indicates the current relevance of the widget’s content.”
Now, in the provider, we add the structure to retrieve the item numbers:
@MainActor
    private func getNumberOfItems() -> Int {
        guard let modelContainer = try? ModelContainer(for: Item.self) else {
            return 0
        }
        let descriptor = FetchDescriptor<Item>()
        let number = try? modelContainer.mainContext.fetch(descriptor).count
        return number ?? 0
    }
Note the @MainActor, now we change the Provider in this way:
So, every function that uses the getNumberOfItems must use the @MainActor annotation (Its role is to ensure that all code is executed on the main thread).
For more information about timelines, I advise reading the official documentation: Apple Developer – Timeline.
Now do a little changes in the view:
struct ForShareWidgetEntryView : View {
    var entry: Provider.Entry

    var body: some View {
        VStack {
            Text("Time:")
            Text(entry.date, style: .time)

            Text("Emoji:")
            Text(entry.emoji)
            Text("\(entry.number)")
        }
    }
}
Now everything should work. Keep in mind that in a production environment, the operating system decides when to update the widget.
Until now, we have been able to use Swift to create applications for:
iPhone, iPad, Apple computers, Apple TV, Apple Watch
Servers with Vapor
Android using skip.tools
As of today, it is also possible to use Swift to create applications on embedded hardware (like Raspberry Pi Pico, Arduino, and so on).
Currently, the Swift Embedded version is in a preview status (you can find more information here), but it has the potential to become a real alternative to C/C++. Sure, at the moment, languages like Rust have an advantage in this area (not to forget MicroPython), but it’s a game worth playing.
Manage Consent
To provide the best experiences, we use technologies like cookies to store and/or access device information. Consenting to these technologies will allow us to process data such as browsing behavior or unique IDs on this site. Not consenting or withdrawing consent, may adversely affect certain features and functions.
Functional
Always active
The technical storage or access is strictly necessary for the legitimate purpose of enabling the use of a specific service explicitly requested by the subscriber or user, or for the sole purpose of carrying out the transmission of a communication over an electronic communications network.
Preferences
The technical storage or access is necessary for the legitimate purpose of storing preferences that are not requested by the subscriber or user.
Statistics
The technical storage or access that is used exclusively for statistical purposes.The technical storage or access that is used exclusively for anonymous statistical purposes. Without a subpoena, voluntary compliance on the part of your Internet Service Provider, or additional records from a third party, information stored or retrieved for this purpose alone cannot usually be used to identify you.
Marketing
The technical storage or access is required to create user profiles to send advertising, or to track the user on a website or across several websites for similar marketing purposes.