
I believe there’s a component that isn’t utilized often: the Menu, especially on the iPhone. The situation for the iPad, however, is somewhat different. In this post, we’ll take a closer look at this component.
When we select the Menu component from the list of components, the code will look something like this:
Menu("Menu") {
    Text("Menu Item 1")
    Text("Menu Item 2")
    Text("Menu Item 3")
}
It’s a list of elements that aren’t ‘clickable’, but we’re looking for something interactive. In the menu, we can insert any element we desire. In this case, we will add three buttons: the first will allow us to open a Color Picker, while the other two will do nothing.
Menu("Menu") {
      Button(action: {
          presentColorPicker.toggle()
      }) {
         Label(
             title: { Text("Color") },
             icon: { Image(systemName: "eyedropper.full")}
         )
      }
      Button("Option 1") {

      }
      Button("Option 2") {

      }
}
To display:
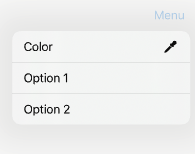
Now, let’s take a look at the entire code. By selecting a color, the background color of the screen will change.
struct ContentView: View {
    @State var colorSelected = Color.white
    @State var presentColorPicker = false
    var body: some View {
        NavigationStack {
            ZStack {
                Color(colorSelected)
                Image(systemName: "globe")
                    .imageScale(.large)
                    .foregroundStyle(.tint)
            }
            .background(colorSelected)
            .toolbar {
                Menu("Menu") {
                    Button(action: {
                        presentColorPicker.toggle()
                    }) {
                        Label(
                            title: { Text("Color") },
                            icon: { Image(systemName: "eyedropper.full")}
                        )
                    }
                    Button("Option 1") {

                    }
                    Button("Option 2") {

                    }
                }
            }
        }.sheet(isPresented: $presentColorPicker) {
            ColorPicker("Select a Color", selection: $colorSelected)
                .padding()
        }
    }
}
Consider incorporating this component into your next app.
Note: English is not my native language, so I apologize for any errors. I use AI solely to generate the banner of the post; the content is human-generated.