From September 2021 is finally available native SwiftUI SearchBar component, so is not anymore necessary to attach UIKit things to have the search bar in a SwiftUI application, but there is a condition, can be restrictive for someone, to use iOS 15.
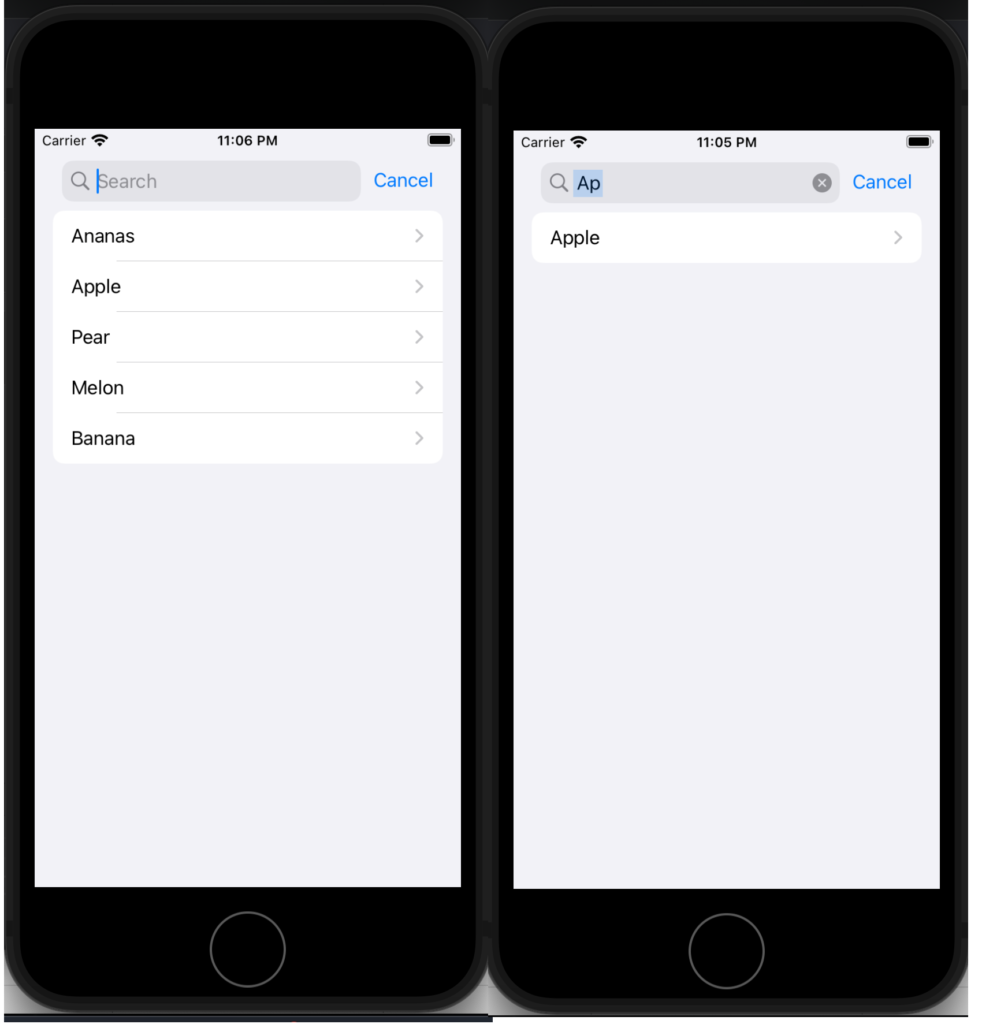
First look at a simple example, use the searchbar to search a string in a list of fruit.
struct SimpleSearchUIView: View {
    let names = ["Ananas", "Apple", "Pear", "Melon", "Banana"]
    @State private var searchText = ""

    var body: some View {
        NavigationView {
            List {
                ForEach(searchResults, id: \.self) { name in
                    NavigationLink(destination: Text(name)) {
                        Text(name)
                    }
                }
            }
            .searchable(text: $searchText)
            .navigationTitle("Fruits")
        }
    }

    var searchResults: [String] {
        if searchText.isEmpty {
            return names
        } else {
            return names.filter {$0.lowercased().contains(searchText.lowercased())}
        }
    }
}
First thing, add a searchable to a List. The searchable is waiting for a text, and the written text is saved in a state variable, in this case, searchText.
The ForEach is not working on a list but with a variable that contains the fruits filtered using the search text. Simply it applies a filter on the names array.
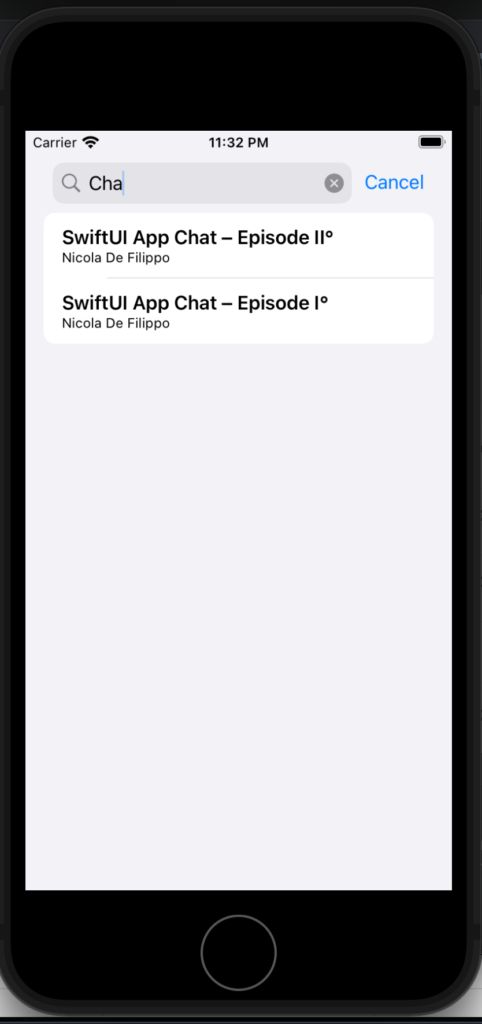
Now see an example using an array of complex type, simply Post type, so defined:
struct Post: Identifiable, Hashable {
    var id = UUID()
    var title: String
    var image: String
}
Now the List and the searchbar working in this way:
struct SerarchUIView: View {
    @State private var searchText = ""
    var posts = [
        Post(title: "Toolbar and Customization", author: "Nicola De Filippo"),
        Post(title: "SwiftUI App Chat – Episode II°", author: "Nicola De Filippo"),
        Post(title: "SwiftUI App Chat – Episode I°", author: "Nicola De Filippo"),
        Post(title: "Navigation", author: "NDF"),
        Post(title: "SwiftUI App Chat – Episode II°", author: "Nicola De Filippo"),
        Post(title: "List in SwiftUI", author: "NDF"),
        Post(title: "State, Binding and Refactoring", author: "Nicola De Filippo")

    ]
    var body: some View {
        NavigationView {
            List(searchResults) { post in
                VStack(alignment: .leading) {
                    Text(post.title)
                        .font(.headline)
                    Text(post.author)
                        .font(.caption)
                }
            }.searchable(text: $searchText)
            .navigationBarTitle("My posts", displayMode: .automatic)
        }
    }

    var searchResults: [Post] {
        if searchText.isEmpty {
            return posts
        } else {
            return posts.filter { (post: Post) in
                return post.title.lowercased().contains(searchText.lowercased())
            }
        }
    }
}
Now the list iterates on a list of posts, the searchable works with a text, instead of the search result in this case filter the array using the title. If everything is ok, you should have:
Note: English is not my native language, so I’m sorry for some errors. I appreciate it if your correct me.
Sometimes in mobile applications is helpful can copy text between applications (i.e. wifi password or simply text). With a simple Text is impossible to do the copy action; it is possible using the QClipBoard, so we have to use a bit of C++.
In my example, we see how to copy the text from a ListItem and past where we want. Start looking at the Qml code:
First, in the example I used https://www.felgo.com but you can use also simple Qml. In the code, we define a ListView with a simple model that has two fields: text and detailText. The delegate is SimpleRow that show these two pieces of information (you can use your custom delegate if you prefer).
In the code you can find an AppTooltip that we use to show a “Copied” message after we copied the text.
How do we copy the text? Simple we call the function setText of the clipboard object.
For a side project I need a simple server, so i choosed an AWS LightSail Linux Server. I installed the Amazon Linux distribution, then using the web ssh console, I installed MongoDB, Golang and other tools that I need. The problem is started when I have to move data on this server, using the command:
First thing, create a UINavigationBarAppearance and clear any default options, then we set the background colour and the text colour. Note that for the text colour we need to specify the colour for when the title is little or large.
We set the appearance to the navigation bar for any possible case.
The last two lines are about the settings of the TabBar.
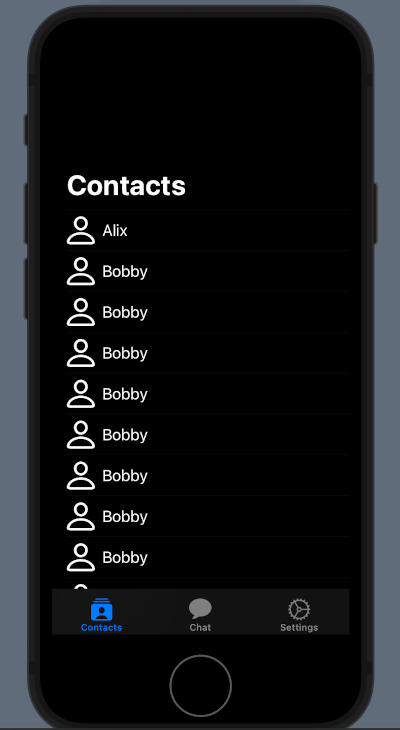
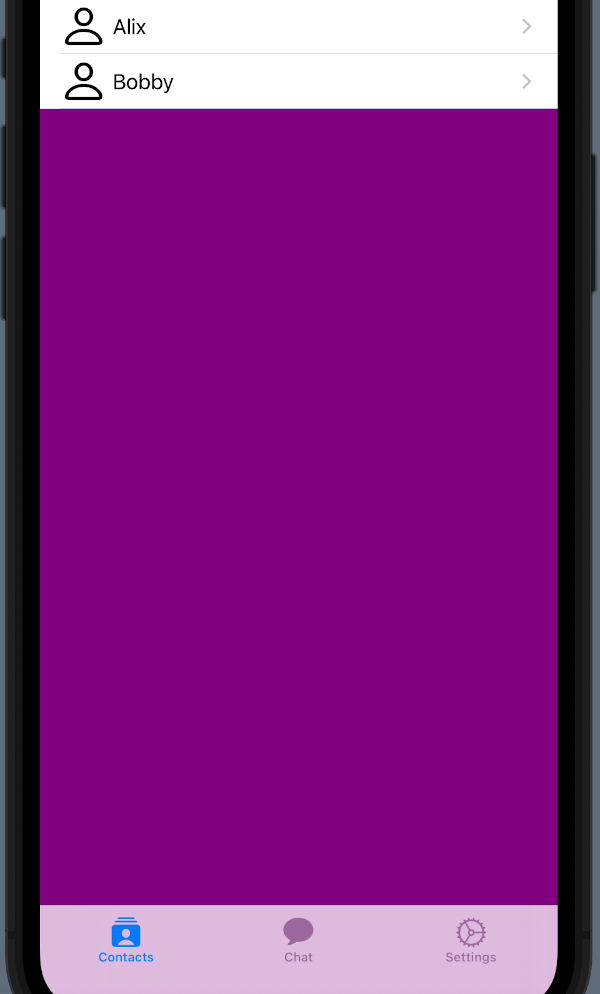
To complete the customization of the contacts list we need to do some changes in the ContactsView:
 init() {
        UITableView.appearance().backgroundColor = .none
        UITableViewCell.appearance().backgroundColor = .none
    }

    var body: some View {
        List {
            ForEach(contacts) { contact in
                ZStack(alignment: .leading) {
                    RowView(contact: contact)
                    NavigationLink(destination: ChattingView()) {
                        EmptyView()
                    }.buttonStyle(PlainButtonStyle()).frame(width:0).opacity(0)
                }
            }.listRowBackground(Color.clear)
        }.background(Color.black)
        .ignoresSafeArea()
    }
}

struct RowView: View {
    var contact: Contact
    var body: some View {
        HStack {
            Image(systemName: "person")
                .resizable()
                .frame(width: 30, height: 30)
                .foregroundColor(.white)
            Text(contact.aliasName)
                .foregroundColor(.white)
        }
    }
}
In the init function we remove the background to the tableview and to the cells present in the view.
Note how with the .listRowBackground(Color.clear) remove the background to the rows and how we set the list background to the list with .background(Color.black).
Why do we need a ZStack to show the rows of the list?
In SwuiftUI we don’t have a simple method to remove the Disclosure indicator (> at the end of the row). To hide this indicator, we overlap the Row with a NavigationLink that have EmptyView (so we can see the RowView) and a buttonStyle with zero width.
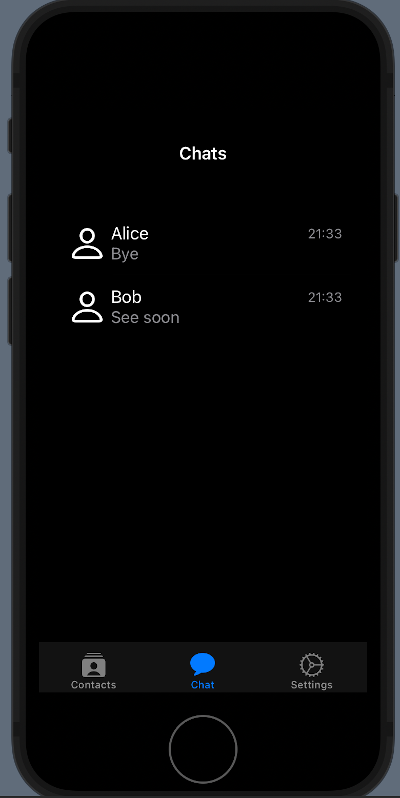
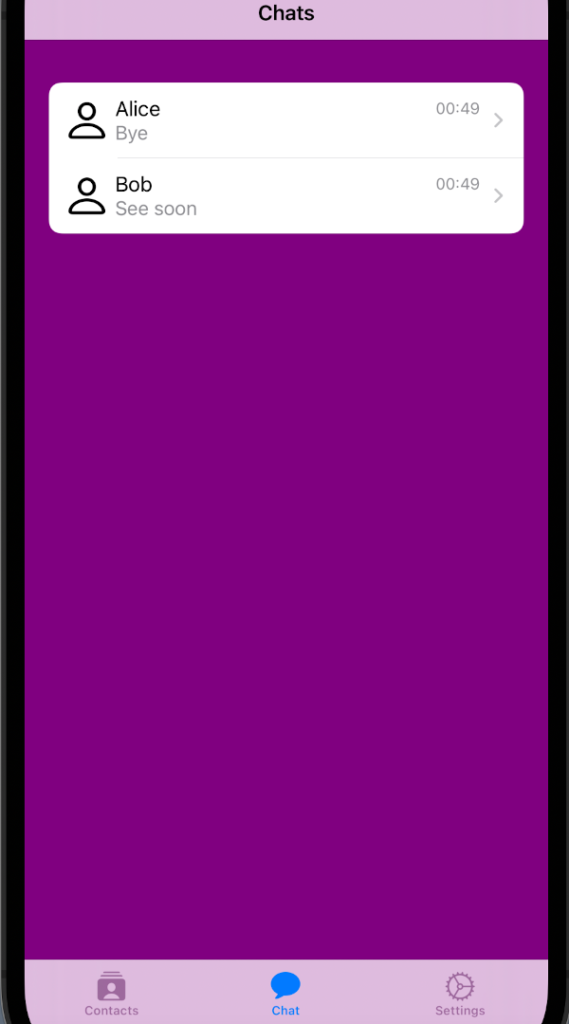
Chats List
We want:
First, remove the background in the init function:
With this post starts a series where the topic is building a chat app using the Smoke protocol, as in every my post I want to share knowledge about SwiftUI, so in this series also who doesn’t have an interest in a chat app can read/learn things helpful also for other types of project.
In memory
Before to start, i want to say that: “This Chat App EEnigma stands for Electronic Enigma. It is a project based on the Echo protocol as e.g. deployed in the Smoke mobile Messenger Application for Android, which is known as as worldwide the first mobile McEliece Messenger. I started this project in memory of my friend Bernd H. Stramm, who passed away two years ago and was also a friend of the inventor of the Echo Protocol, e.g. for secure chat. The aim is to provide students a step by step guide and open source code basis to develop an own chat application with the Swift programming language.”
The three views ContactsView, ChatView and SettingsView don’t exist yet. Note the NavigationView in the first tab, the ContactsVIew is within a NavigationView (with no title), I do it because I want ( when I tap a contact) to open a view to chat.
See the ContactView:
struct ContactsView: View {
    var contacts: Array<Contact> = [Contact(name: "Alice", lastName: "Fish", aliasName: "Alix"),
        Contact(name: "Bob", lastName: "Bird", aliasName: "Bobby")
    ]

    var body: some View {
        List {
            ForEach(contacts) { contact in
                NavigationLink(destination: ChattingView(), label: {
                    RowView(contact: contact)
                })
            }
        }
    }
}

struct RowView: View {
    var contact: Contact
    var body: some View {
        HStack {
            Image(systemName: "person")
                .resizable()
                .frame(width: 30, height: 30)
            Text(contact.aliasName)
        }
    }
}
I defined a Contact in this way:
struct Contact: Identifiable {
    var id = UUID()
    var name: String
    var lastName: String
    var aliasName: String
}
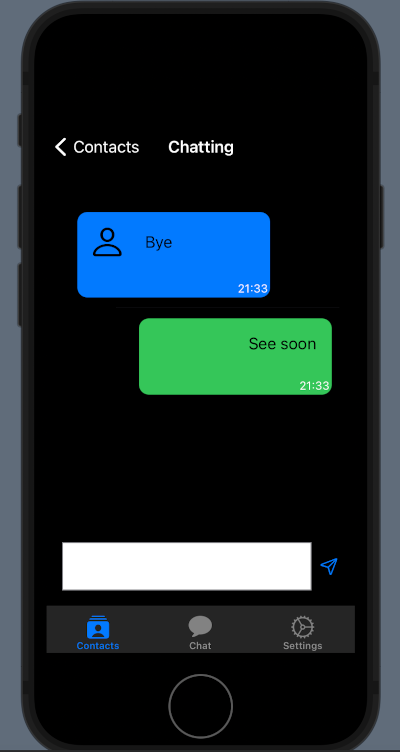
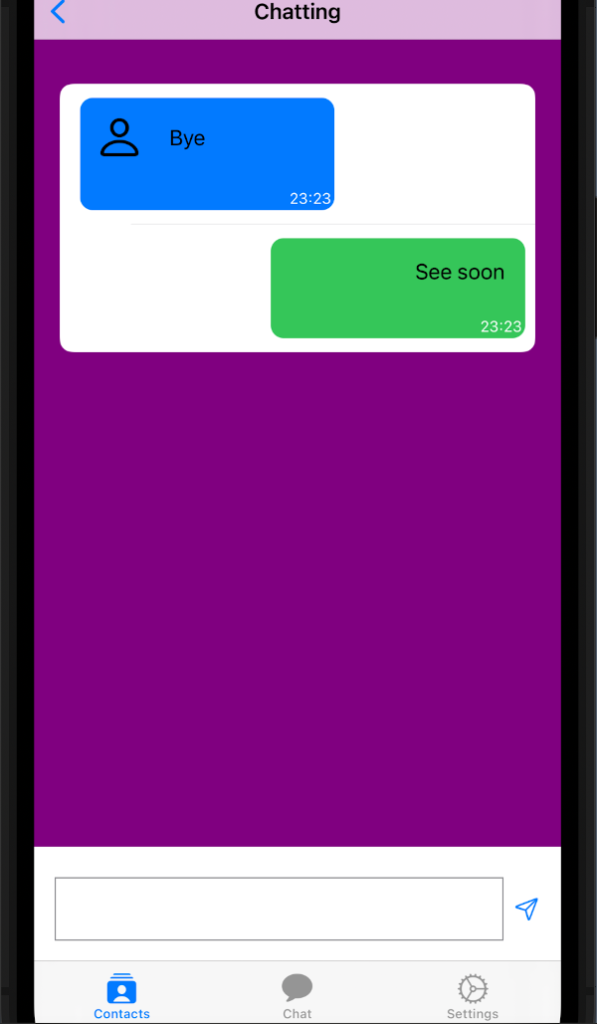
Chatting
The ContactsView is defined as an array of fake contacts and in the List, we iterate this array and show (using the RowView) the default image “person” and the alias of the contact. Note as there is a NavigationLink that contains the RowView. If we tab the row the view change in the destination ChattingView.
How in all the chat app, on the left we have the messages received and on the right the messages sent.
At the bottom, there are TextEdit and a button to write and send a message. We want to close the keyboard when tapping the send button or tap in any place on the view. See all piece by piece.
struct Chat: Identifiable {
    var id = UUID()
    var name: String
    var image: String
    var lastMessage: String
    var timestamp: Date
    var chatId: String
}
The chat has the name of the sender, an image (we’ll remove when we’ll do refactoring), the last message sent from the “name”, and the Id of the chat and when the message has arrived.
This row so has a VStack aligned on the left, within an HStack with a fixed maximum width, we don’t want a rectangle that fills all the width. In this stack, we add at the end a Spacer to force the alignment on the left. Note instead of the alignment of the stack on the right, it’s necessary to have the time on the right.
It’s very similar to the “blue”. In this case, there is no image, because this message is of the user and in the HStack the Spacer is at the beginning because we want to align the text on the right.
In the init, I set the background colour to purple.
With the function endEditing, we dismiss the keyboard, this function is called when the user taps the send button or when taps anywhere on the view.
The Chat part contains a list of the messages, in the foreach, we verify if the message is of the sender or the user. To simplify in this example, I assumed that the user is Bob (in future we’ll remove any embedded value). With .listStyle(SidebarListStyle()) we remove the line separator, instead with onTapGesture we catch this gesture and close the keyboard (is open).
In the input part, we set a TextEdit in the bar on the bottom calling the .ignoresSafeArea(.keyboard, edges: .bottom), in this way the HStack is on the bottom but when appears the keyboard the Hstack is moved on top of the keyboard, so the user can see what he writes.
To default (for now) when simulating the send of the message, the owner is Bob, so we see the message in the green rectangle.
This piece of code has things already seen in the previous: a NavigationLink on the row and when it’s tapped the view skip to destination ChattingView.
I suggest playing with HStack, VStack, Spacer and fonts to have better effects.
How said at the beginning it’s only the first episode, in the next week, we’ll create a nice real chat app.
Note: English is not my native language, so I’m sorry for some errors. I appreciate it if your correct me.
Manage Consent
To provide the best experiences, we use technologies like cookies to store and/or access device information. Consenting to these technologies will allow us to process data such as browsing behavior or unique IDs on this site. Not consenting or withdrawing consent, may adversely affect certain features and functions.
Functional
Always active
The technical storage or access is strictly necessary for the legitimate purpose of enabling the use of a specific service explicitly requested by the subscriber or user, or for the sole purpose of carrying out the transmission of a communication over an electronic communications network.
Preferences
The technical storage or access is necessary for the legitimate purpose of storing preferences that are not requested by the subscriber or user.
Statistics
The technical storage or access that is used exclusively for statistical purposes.The technical storage or access that is used exclusively for anonymous statistical purposes. Without a subpoena, voluntary compliance on the part of your Internet Service Provider, or additional records from a third party, information stored or retrieved for this purpose alone cannot usually be used to identify you.
Marketing
The technical storage or access is required to create user profiles to send advertising, or to track the user on a website or across several websites for similar marketing purposes.