SwiftUI Chat App update

In this post, I’m writing a new version of the old posts about a chat GUI built with SwiftUI. I’ve removed the deprecated APIs and used the new ones released with iOS 18.

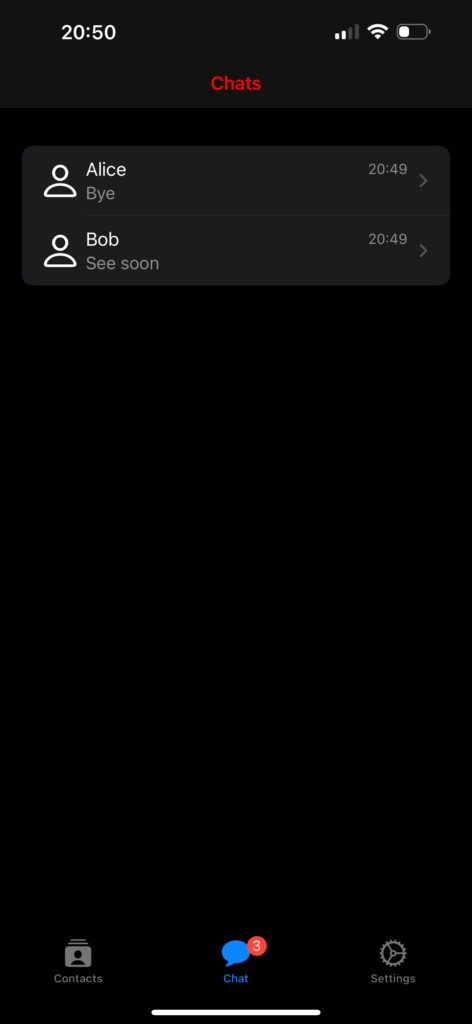
We are creating these screens: a list of contacts, a list of chats, and a chat screen. Note the red notification number on the chats tab.
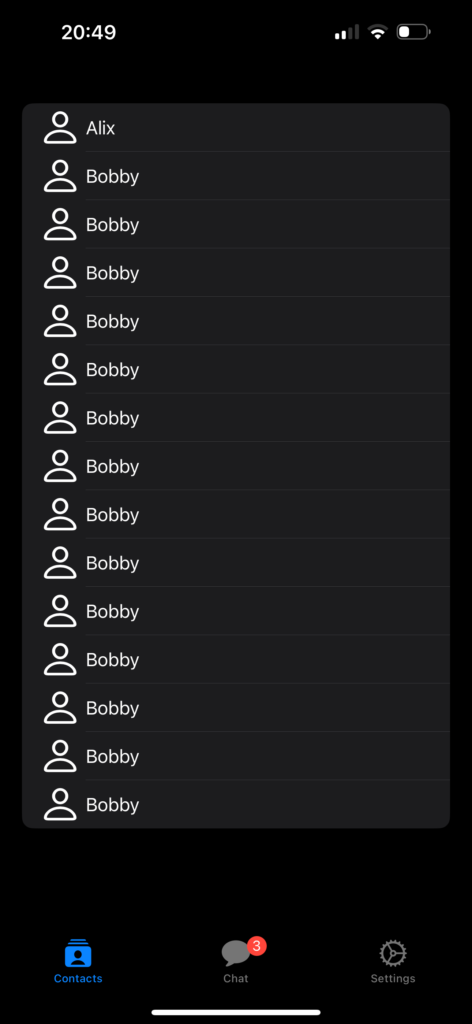
The contacts

struct ContentView: View {
    init () {
        let navBarAppearance = UINavigationBarAppearance()
        navBarAppearance.titleTextAttributes = [.foregroundColor: UIColor.red]
        navBarAppearance.largeTitleTextAttributes = [.foregroundColor: UIColor.red]
        UINavigationBar.appearance().backgroundColor = .black
        UINavigationBar.appearance().standardAppearance = navBarAppearance
        UINavigationBar.appearance().compactAppearance = navBarAppearance
        UINavigationBar.appearance().scrollEdgeAppearance = navBarAppearance
        UINavigationBar.appearance().tintColor = UIColor.red
    }
    
    var body: some View {
        TabView {
            Tab("Contacts", systemImage: "rectangle.stack.person.crop.fill") {
                NavigationStack {
                    ContactsView()
                        .navigationBarTitle("Contacts", displayMode: .inline)
                }
            }
            Tab("Chat", systemImage: "message.fill") {
                NavigationStack {
                    ChatsView()
                }
            }.badge(3)
            Tab("Settings", systemImage: "gear") {
                SettingsView()
            }
        }
    }
}

In the init, we initialize the background and foreground colors for the tab bar and navigation.

The body contains a neat way to define the TabView (refer here for more details https://nicoladefilippo.com/tabview-in-ios-18-and-xcode-16/). The Chat tab uses the badge property to display the red number, as shown in the example.

Chats Vew

struct ChatsView: View {
    var chats: Array<Chat> = [Chat(name: "Alice", image: "person", lastMessage: "Bye", timestamp: Date(), chatId: "1"), Chat(name: "Bob", image: "person", lastMessage: "See soon", timestamp: Date(), chatId: "2")
    ]
    
    init () {
        let navBarAppearance = UINavigationBarAppearance()
        navBarAppearance.titleTextAttributes = [.foregroundColor: UIColor.red]
        navBarAppearance.largeTitleTextAttributes = [.foregroundColor: UIColor.red]
        UINavigationBar.appearance().backgroundColor = .black
        UINavigationBar.appearance().standardAppearance = navBarAppearance
        UINavigationBar.appearance().compactAppearance = navBarAppearance
        UINavigationBar.appearance().scrollEdgeAppearance = navBarAppearance
        UINavigationBar.appearance().tintColor = UIColor.red
    }
    
    var body: some View {
        VStack{
            NavigationStack {
                List {
                    ForEach(chats) { chat in
                        NavigationLink(destination: ChattingView()){
                            HStack {
                                Image(systemName: "person")
                                .resizable()
                                .frame(width: 30, height: 30)
                                VStack(alignment: .leading) {
                                    HStack {
                                        Text(chat.name)
                                        Spacer()
                                        Text(timeFormat(date: chat.timestamp))
                                        .foregroundStyle(.gray)
                                        .font(.footnote)
                                    }
                                    Text(chat.lastMessage)
                                    .foregroundStyle(.gray)
                                    .font(.callout)
                                }
                            }
                        }
                    }
                }.scrollContentBackground(.hidden).background(Color.black)
            }
        }.frame(maxWidth: .infinity, maxHeight: .infinity)
        .background(Color.black)
        .navigationBarTitle("Chats", displayMode: .inline)
    }
}

In this view, we define an array of contacts that we display using a List and ForEach, where each row contains an image, the contact’s name, and the last chat time.

With .scrollContentBackground(.hidden).background(Color.black), we set the List background to black.

The VStack that contains everything has the background also set to black, ensuring the entire screen is black, even when the list doesn’t fill the entire screen.

Chat View

struct ChattingView: View {
    @State var chats: Array<Chat> =
    [Chat(name: "Alice", image: "person", lastMessage: "Bye", timestamp: Date(), chatId: "1"),
     Chat(name: "Bob", image: "person", lastMessage: "See soon", timestamp: Date(), chatId: "2")
    ]
    
    @State var writing: String = ""
    init () {
        let navBarAppearance = UINavigationBarAppearance()
        navBarAppearance.titleTextAttributes = [.foregroundColor: UIColor.red]
        navBarAppearance.largeTitleTextAttributes = [.foregroundColor: UIColor.red]
        UINavigationBar.appearance().backgroundColor = .black
        UINavigationBar.appearance().standardAppearance = navBarAppearance
        UINavigationBar.appearance().compactAppearance = navBarAppearance
        UINavigationBar.appearance().scrollEdgeAppearance = navBarAppearance
        UINavigationBar.appearance().tintColor = UIColor.red
    }
    
    var body: some View {
        VStack(spacing: 0) {
            // Chat
            Spacer()
            List {
                ForEach(chats) { chat in
                    if chat.name == "Bob" {
                        UserRowView(chat: chat)
                        
                    } else {
                        ChatRowView(chat: chat)
                    }
                }.listRowBackground(Color.clear)
                .listRowSeparator(.hidden)
            }.scrollContentBackground(.hidden)
            .navigationBarTitle("Chatting", displayMode: .inline)
            .onTapGesture {
                self.endEditing()
            }
            // Input
            HStack() {
                TextEditor(text: $writing)
                    .frame(minHeight: 0, maxHeight: 50)
                    .border(Color.gray)
                
                Button(action: {
                    chats.append(Chat(name: "Bob", image:"", lastMessage: writing, timestamp: Date(), chatId: ""))
                    writing = ""
                    self.endEditing()
                }) {
                    Image(systemName: "paperplane")
                }
                
            }.ignoresSafeArea(.keyboard, edges: .bottom)
            .padding()
        }.background(Color.black)
    }
    
    private func endEditing() {
    UIApplication.shared.sendAction(#selector(UIResponder.resignFirstResponder), to:nil, from:nil, for:nil)
    }
}

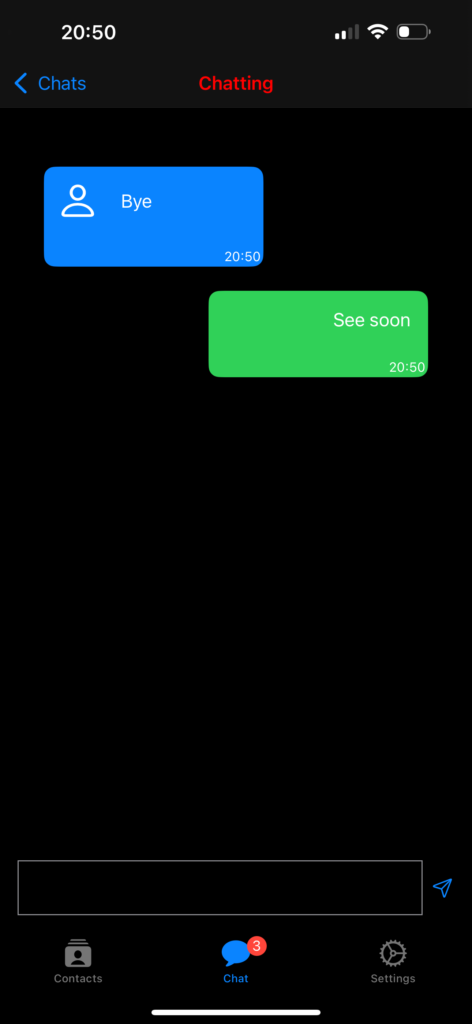
This view also contains the settings for the tab bar and navigation. For the list of chats, we hide the scroll indicator and the row separator. We have two types of rows: one for the user (Bob) and the other to show messages from other people. We’ll take a closer look at that below. Now, please pay attention to the endEditing function; it’s called to hide the keyboard when the message is sent or when we want to stop typing.

Take a look at the rows:

struct ChatRowView: View {
    var chat: Chat
    var body: some View {
        VStack (alignment: .trailing){
            HStack() {
                Image(systemName: chat.image)
                    .resizable()
                    .frame(width: 30, height: 30)
                    .padding()
                Text(chat.lastMessage)
                Spacer()
            }.frame(maxWidth: 200)
            Text(timeFormat(date: chat.timestamp))
                .padding(2)
                .font(.caption)
                .foregroundStyle(.white)
        }.background(Color.blue)
        .clipShape(RoundedRectangle(cornerRadius: 10))
    }
}

struct UserRowView: View {
    var chat: Chat
    var body: some View {
        HStack {
            Spacer()
            VStack (alignment: .trailing){
                HStack() {
                    Spacer()
                    HStack {
                        Spacer()
                        Text(chat.lastMessage)
                            .padding()
                    }
                }
                Text(timeFormat(date: chat.timestamp))
                    .padding(2)
                    .font(.caption)
                    .foregroundStyle(.white)
            }.background(Color.green)
            .frame(minWidth: 10, maxWidth: 200)
            .clipShape(RoundedRectangle(cornerRadius: 10))
        }
    }
}

func timeFormat(date: Date) -> String {
    let formatter = DateFormatter()
    formatter.dateFormat = "HH:mm"
    return formatter.string(from: date)
}

The rows don’t have anything special apart from the alignment, but they use a new API to create rounded corners. Instead of using the deprecated cornerRadius, we utilize clipShape with a RoundedRectangle that has a corner radius.

You can find the comple code here: https://github.com/niqt/EEnigma/tree/main

What I Learned from Teaching Coding: AI, Soft Skills, and Student Challenges

Last friday my extracurricular course at the University of Sannio concluded (for 2024). For those who don’t know, it’s a full immersion course lasting one month that allows participants to gain basic knowledge in coding, design, storytelling, etc., to present a prototype of an iOS application developed with SwiftUI. From my perspective, it’s a fascinating experience that keeps me feeling young, even though it requires some personal sacrifice and the willingness of the company I collaborate with to not be able to reach me in the morning.

At the end of each course, I always ask myself what worked, what could have gone better, and what I can improve. But I always wonder what I “take away” from this experience:

• Guiding 30 “juniors” for a month enhances soft skills.
• By explaining, you learn more (perhaps that’s obvious).
• Ideas for my posts arise from the questions or curiosities of the students.

This time, I also have an additional reflection: the benefits of AI tools during coding. From what I observed, the results were not satisfying. It’s worth noting that most students come from computer science backgrounds; some are at the end of their studies, others at the beginning, and there are even people who have never programmed in their lives. The quality of the prototypes was generally similar to that of previous years, but upon closer examination, I found more malfunctions due to poor programming and the use of code generated by AI. I often saw solutions based on outdated APIs or proposals that seemed to “shoot flies with a cannon.”

From what I observed, there were more errors, and students learned less. Perhaps the good old Stack Overflow was better: at least when they used code from there, they always had doubts about how it worked; today, however, there’s a “blind” trust in the tool. I don’t foresee an easy period for software quality

TabView in iOS 18 and XCode 16

One of the things that i like with the SwiftUI released with XCode 16 is the new way to write a TabView.

Now we can write:

struct ContentView: View {
    
    var body: some View {
        TabView {
            Tab("Contacts", systemImage: "rectangle.stack.person.crop.fill") {
                // Your View 1
                }
            }
            Tab("Chat", systemImage: "message.fill") {
                // Your View 2
            }
            Tab("Settings", systemImage: "gear") {
               // Your View 3
            }
        }
    }
}

In the Tab properties we define the title and the image, in the body the view that we want display when that tab is selected. It’s very clear way.

Instead before of that we have to do:

struct ContentView: View {
    
    var body: some View {
        TabView {
            // Your View1
            .tabItem(Label("Contacts", systemImage: "rectangle.stack.person.crop.fill"))
            // Your View2
            .tabItem(Label("Chats", systemImage: "message.fill"))
            // Your View3
            .tabItem(Label("Settings", systemImage: "gear"))
        }
    }
}

Less clear, we have to attach the .tabItem to every View, before declare the view and then the tabbar element.

In the next post i’ll disaplay a chat app example.

Navigation in SwiftUI

Updated to iOS 18

In the previous posts, we have seen the fundaments of the SwiftUI. Now is the moment to starts to build something a bit more complex, how to implement the navigation in our apps with NavigationBar and the TabView.

NavigationBar

Start from the code of the previous post (https://nicoladefilippo.com/list-in-swiftui/):

struct Vehicle: Identifiable {
    var id = UUID()
    var name: String
    var image: String
}

struct ContentView: View {
    @State var vehicles = [Vehicle(name: "car", image: "car"),
                    Vehicle(name: "bus", image: "bus"),
                    Vehicle(name: "tram", image: "tram"),
                    Vehicle(name: "bicycle", image: "bicycle")]
    
    var body: some View {
        List {
            ForEach(vehicles) { vehicle in
                RowView(vehicle: vehicle)
            }
            .onDelete { (indexSet) in
                self.vehicles.remove(atOffsets: indexSet)
            }
        }
    }
}

struct RowView: View {
    var vehicle: Vehicle
    var body: some View {
        HStack {
            Image(systemName: vehicle.image)
                .resizable()
                .frame(width: 60, height: 60)
            Text(vehicle.name)
        }
    }
}

We want to tap on one row and skip to a new view.

The first step is add a NavigationStack:

var body: some View {
        NavigationStack {
            List {
                ForEach(vehicles) { vehicle in
                    NavigationLink { EmptyView()
                    } label:{
                        RowView(vehicle: vehicle)
                    }
                }
                .onDelete { (indexSet) in
                    self.vehicles.remove(atOffsets: indexSet)
                }
            }.navigationTitle("Transports")
        }
    }

In the NavigationStack we insert the List how in the previous example. To add a title to the NavigationStack, you have to use the navigationTitle function.

To jump to another view we have to use the NavigationLink. In the body of this, we insert the RowView (we want to click on the row to jump) and how destination we use EmptyView, a blank default view, so if we tap on any row:

We want a not empty view but a view that display something.

Let’s go to create a view. First, from the file menu select the new file voice and then:

From the dialog select SwiftUI View and call it VehicleView.

Replace the EmptyView with the VehicleView:

NavigationLink { 
      VehicleView(vehicle: vehicle)
    } label:{
         RowView(vehicle: vehicle)
    }

Now tapping on the list you jump on the new view and you’ll see “hello world”.

To show the info of the selected row, change the code of the VehicleView in:

import SwiftUI

struct VehicleView: View {
    var vehicle: Vehicle
    var body: some View {
        VStack(spacing: 20) {
            Image(systemName: vehicle.image)
                .resizable()
                .frame(width: 300, height: 300)
            Text("Selected the \(vehicle.name.uppercased())")
                .font(.title)
            Spacer()
        }
    }
}

#Preview {
    VehicleView(vehicle: Vehicle(name: "car", image: "car"))
}

In the view, there is defined a var of Vehicle type that we suppose contains the row passed, and show the information how defined in the VStack (see the post about VStack https://nicoladefilippo.com/layout-in-swiftui/). Note that in the Preview we pass a vehicle, it’s a default view used only for the preview (it’s helpful when you “design” the view without running the code).

How you can see we pass to the VehicleView vehicle. If everything it’s ok, if you tap the bus, you should have:

Is possible to have the title of the bar in the centre? Sure, add the navigationBarTitleDisplayMode in this way:

var body: some View {
        NavigationView {
            List {
                ForEach(vehicles) { vehicle in
                    NavigationLink(destination: VehicleView(vehicle: vehicle)) {
                        RowView(vehicle: vehicle)
                    }
                }
                .onDelete { (indexSet) in
                    self.vehicles.remove(atOffsets: indexSet)
                }
            }.navigationBarTitleDisplayMode(.inline)
                .navigationTitle("Vehicle")
        }
    }

Note the displayMode set to .inline.

Tab View

Now see how to define the TabView:

struct ContentView: View {
    var body: some View {
        TabView {
            Tab("Vehicles", systemImage: "list.dash") {
                Text("Tab1")
            }
            Tab("Profile", systemImage: "person.circle") {
                Text("Tab2")
            }
        }
    }
}

The magic word is TabView. In the body of this, we insert the views with relative Tab.

Now to create something more complex, we can use the code from the navigation stack example.

First, create a VehiclesView (note the plural).

import SwiftUI

struct Vehicle: Identifiable {
    var id = UUID()
    var name: String
    var image: String
}

struct VehiclesView: View {
    @State var vehicles = [Vehicle(name: "car", image: "car"),
                    Vehicle(name: "bus", image: "bus"),
                    Vehicle(name: "tram", image: "tram"),
                    Vehicle(name: "bicycle", image: "bicycle")]
    
    var body: some View {
        NavigationView {
            List {
                ForEach(vehicles) { vehicle in
                    NavigationLink(destination: VehicleView(vehicle: vehicle)) {
                        RowView(vehicle: vehicle)
                    }
                }
                .onDelete { (indexSet) in
                    self.vehicles.remove(atOffsets: indexSet)
                }
            }.navigationBarTitleDisplayMode(.inline)
                .navigationTitle("Vehicle")
        }
    }
}

struct RowView: View {
    var vehicle: Vehicle
    var body: some View {
        HStack {
            Image(systemName: vehicle.image)
                .resizable()
                .frame(width: 60, height: 60)
            Text(vehicle.name)
        }
    }
}

#Preview {
    VehiclesView()
}

Then, create a VehicleView as in the NavigationStack example and then change the TabView:

struct ContentView: View {
    var body: some View {
        TabView{
            Tab("Vehicles", systemImage: "list.dash") {
                VehiclesView()
            }
            Tab("Profile", systemImage: "person.circle") {
                Text("Tab2")
            }
        }
    }
}

Now in the first tab, we have a navigation stack and we can navigate in the first tab.

For exercise, you can create a profile page.

Note: English is not my native language, so I’m sorry for some errors. I appreciate it if your correct me.

Books to improve as a software developer

In the past few weeks, a junior developer asked me for some advice about books. I created this list, and I believe they should be a must-read for everyone involved in the software world:

  • The Pragmatic Programmer: Your Journey to Mastery, 20th Anniversary Edition
  • Clean Architecture: A Craftsman’s Guide to Software Structure and Design
  • Clean Code: A Handbook of Agile Software Craftsmanship
  • The Software Craftsman: Professionalism, Pragmatism, Pride
  • Extreme Programming Explained: Embrace Change
  • Release It!: Design and Deploy Production-Ready Software
  • Fundamentals of Software Architecture: An Engineering Approach
  • Head First Design Patterns: A Brain-Friendly Guide: Building Extensible and Maintainable Object-Oriented Software
  • The Phoenix Project: A Novel About IT, DevOps, and Helping Your Business Win
  • Refactoring: Improving the Design of Existing Code (Second Edition)

A bonus: Lean Customer Development: Building Products Your Customers Will Buy.

I suggest this last one because we need to understand our customers. We build software for others.