
In this episode, we’ll learn how to use the LookAround feature in our applications. To summarize, we will cover:
- How to select a marker on the map
- How to display the 3D landscape of the selected marker
Starting from the end, we aim for this:
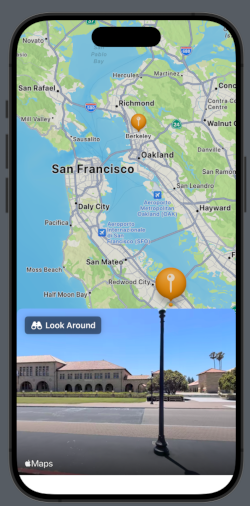
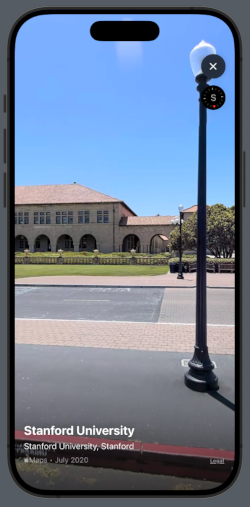
And by tapping on Look Around:
We’ll use the same points as in the previous example [https://nicoladefilippo.com/map-in-swiftui-episode-ii/], and we’ll also incorporate a Sheet for detailed explanations [https://nicoladefilippo.com/swiftui-sheets-demystified-episode-i/].
Select a Marker
struct ContentView: View {
    @State var position: MapCameraPosition = .region(MKCoordinateRegion(
        center: .init(latitude: 37.554169, longitude: -122.313057),
        span: .init(latitudeDelta: 0.7, longitudeDelta: 0.7)
    ))

    @State var placeSelected: Int?

    var places = [Place(name: "Berkeley", coordinates: CLLocationCoordinate2D(latitude: 37.8715, longitude: -122.2730)), Place(name: "Stanford", coordinates: CLLocationCoordinate2D(latitude: 37.4280, longitude: -122.1697))]

    var body: some View {
        VStack{
            Map(position: $position, selection: $placeSelected) {
                ForEach(Array(places.enumerated()), id: \.offset) { index, place in
                    Marker(place.name, coordinate: place.coordinates)
                        .tint(.orange)
                }
            }
        }
    }
Let’s begin by setting the position (the initial center of the map) in San Mateo, CA. We’ll declare a variable placeSelected that will contain the index of the selected marker, and an array of places, where each place is defined as follows:
struct Place: Identifiable {
    let id = UUID()
    var name: String
    var coordinates: CLLocationCoordinate2D = .init(latitude: 0.0, longitude: 0.0)
}
The placeSelected variable is optional because it can assume a nil value, not only at the beginning but also when tapping on different places on the map apart from the markers.
Therefore, the map is declared by passing the initial position and the selectedPlace.
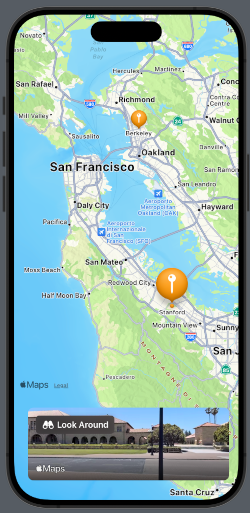
If you noticed, in the second image the selected balloon is larger. If we also want to change its color, we can use a function like this:
func getColor(_ index: Int, _ selected: Int?) -> Color {
   if selected != nil && selected! == index{
       return .blue
   }
   return .orange
}
…and use it in the tint setting:
Marker(place.name, coordinate: place.coordinates)
.tint(getColor(index, placeSelected))
Show the 3D landscape of the selected marker
First, let’s create the sheet that contains a preview of the LookAround feature:
struct SheetUIView: View {
    @State private var lookAroundScene: MKLookAroundScene?
    var selectedPlace: Place
    var body: some View {
        LookAroundPreview(initialScene: lookAroundScene)
        .onAppear {
            lookAroundScene = nil
            Task {
                let request = MKLookAroundSceneRequest(coordinate: selectedPlace.coordinates)
                lookAroundScene = try? await request.scene
            }
        }
    }
}
This view declares a lookAroundScene that contains the scene. This variable is set by calling a request to MKLookAroundSceneRequest. This operation is executed in a Task to avoid freezing the application.
Now, let’s see how to use this view:
@State var isPresented: Bool = false
    var body: some View {
        VStack{
            Map(position: $position, selection: $placeSelected) {
                ForEach(Array(places.enumerated()), id: \.offset) { index, place in
                        Marker(place.name, coordinate: place.coordinates)
                        .tint(.orange)
                }
            }
        }.sheet(isPresented: $isPresented, content: {
            SheetUIView(selectedPlace: places[placeSelected!])
                .presentationDetents([.fraction(0.4)])
        })
        .onChange(of: placeSelected) {
            guard placeSelected != nil else { return }
                isPresented = true
        }
    }
First, we added an isPresented variable; when it’s true, the sheet is displayed. Using .presentationDetents([.fraction(0.4)]), we set the height of the sheet to 40% of the screen height. This view receives the selected place as a parameter.
The event of placeSelected being changed is captured by onChange. Here, we verify that the variable is not nil, and only in this case isPresented becomes true, causing the sheet to appear.
Another method to present the LookAround feature could be as follows
var body: some View {
        VStack{
            Map(position: $position, selection: $placeSelected) {
                ForEach(Array(places.enumerated()), id: \.offset) { index, place in
                        Marker(place.name, coordinate: place.coordinates)
                        .tint(.orange)
                }
            }
        }.safeAreaInset(edge: .bottom) {
            HStack {
                Spacer()
                VStack(spacing: 0) {
                    if isPresented {
                        SheetUIView(selectedPlace: places[placeSelected!])
                        .frame(height: 128)
                        .clipShape(RoundedRectangle(cornerRadius: 10))
                        .padding([.top, .horizontal])
                        }
                    }
            }
            Spacer()
        }
        .onChange(of: placeSelected) {
            guard placeSelected != nil else { return }
                isPresented = true
        }
    }
This time, we display the preview of the LookAround feature at the bottom of the screen, not using a sheet dialog, but by inserting the SheetView into the safe area. Here, the view has rounded corners and a fixed height, as shown in the screen:
That’s all for this episode.
Thanks for the clear descriptions and example code.
I have three issues that puzzle me:
1) Have you made this a searchable start location rather than fixed in code? Example?
2) How do you tap into this look around view to move the image to a different location? People would be interested in “driving” from that location to somewhere nearby using this view.
3) Have you found a way to make an image of a screenshot of a map or a list view using iOS17? This is missing on all my searches. I was successful with objective-c and with Swift on earlier versions but for some reason it is not obvious for iOS17.
Thanks
Thanks
Hi,
thanks for the comment. I’ll try to answer your question with a post in the next week.
Question 2 is actually solved in your example once I got your example running. Thanks.
You have also provided an example in “episode IV” which gives the structure for searching. In your example I need to add a location manager and call this search func. A temp location works butI have not yet been able to call search yet. The async part is still a bit confusing. Perhaps you could provide some clarification on that part?
Question 3) is still a problem for me. I tried a number of screenshot methods. One resulted in a “forbidden” symbol being returned. I think there is a completely new API for screenshots in iOS17 but have not been able to find documentation yet.
Thanks.
@Earle Sorry, can you explain how do you want use the searchable? Do you want use the current user position?
About the question 3, i think it’s not simple, do you tried this https://github.com/RickeyBoy/ScreenshotableView ?
Yes, I have tried the RickeyBoy method thanks. It does not capture a map. The screen is white when I tried adding a map. My application places markers at selected points on an aviation flight route and calculates the leg distances and very accurate magnetic headings. All these need to be captured on the screenshot from the map. There are screen shot methods that recreate a map region but they do not capture content. It surprises me that Apple would not make this readily available since screen capture was simple with Objective-c and Swift.
I am upgrading my GPS WIZ app. I can send you a promo code if you wish to see the details.
In this same app I am looking to add Search to the map. Specifically to add the capability to select a location and look around feature, which you have demonstrated very well. I also want to find an address and show driving turn-by-turn instructions (hopefully with audio) and a simple route to that address, as in most navigation apps. You have shown the route but I do not see turn-by-turn capabilities, but I am using the simulator.
Regards