Map in SwiftUI (Episode I°)

This post is the first in a series about using Maps in SwiftUI. In this post, we’ll learn how to:

  • Create a Map
  • Show the user’s position
  • Add a circle centered on the user’s position

Map Creation

First, we need to add values in the info.plist for:

  • Privacy – Location Always Usage Description
  • Privacy – Location When In Use Usage Description

Now, let’s take a look at the code:

import SwiftUI
import MapKit

struct ContentView: View {
    @State var position: MapCameraPosition = .region(MKCoordinateRegion(
        center: .init(latitude: 47.499167,longitude: 8.726667),
        span: .init(latitudeDelta: 0.2, longitudeDelta: 0.2)
    ))
    
    var body: some View {
        ZStack{
            Map(position: $position) 
            .ignoresSafeArea(.all)
        }
    }
}

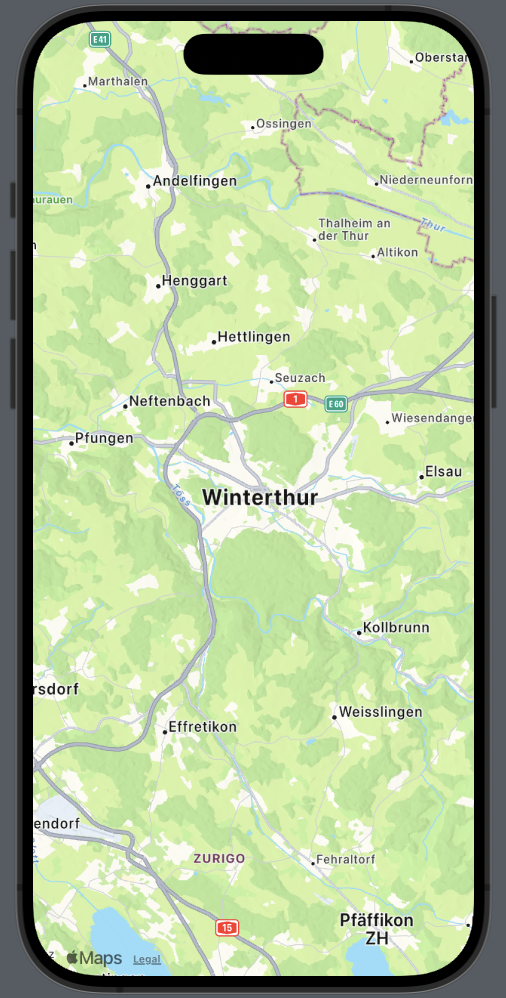
To use the map, we need to import MapKit, then define a position such as MapCameraPosition (with iOS 17, the direct use of the region is deprecated). The span represents the amount of map to display (think of it as zoom). (I used the coordinates of Winterthur in memory of Niklaus Wirth, who passed away a few days ago). The map is displayed in fullscreen mode because it ignores the safe area.

Show User Position

Now, take a look at how to create a map centered on the user’s position:

struct ContentView: View {
    let locationManager = CLLocationManager()

    @State var position: MapCameraPosition = .userLocation(fallback: .automatic)
    
    var body: some View {
        ZStack{
            Map(position: $position) {
                UserAnnotation()
            }
            .ignoresSafeArea(.all)           .onAppear{self.locationManager.requestWhenInUseAuthorization()
            }
        }
    }
}

First, we define a locationManager; it’s necessary to access the user’s position. When the map appears, it will request the user’s permission.

In this case, ‘position’ contains the user’s location (the fallback is a position to use if the map hasn’t resolved the person’s location).

Add a circle around the user position

struct ContentView: View {
    let locationManager = CLLocationManager()
    @State var distance: CLLocationDistance = 500.0
    @State var defaultLocation: CLLocationCoordinate2D = CLLocationCoordinate2D(latitude: 0.0, longitude: 0.0)

    @State var position: MapCameraPosition = .userLocation(fallback: .automatic)
    
    var body: some View {
        ZStack{
            Map(position: $position) {
                MapCircle(center:  locationManager.location?.coordinate ?? defaultLocation, radius: distance)
                    .foregroundStyle(Color(white: 0.4, opacity: 0.25))
                    .stroke(.orange, lineWidth: 2)
                UserAnnotation()
            }
            .ignoresSafeArea(.all)
            .onAppear{self.locationManager.requestWhenInUseAuthorization()
            }
        }
    }
}

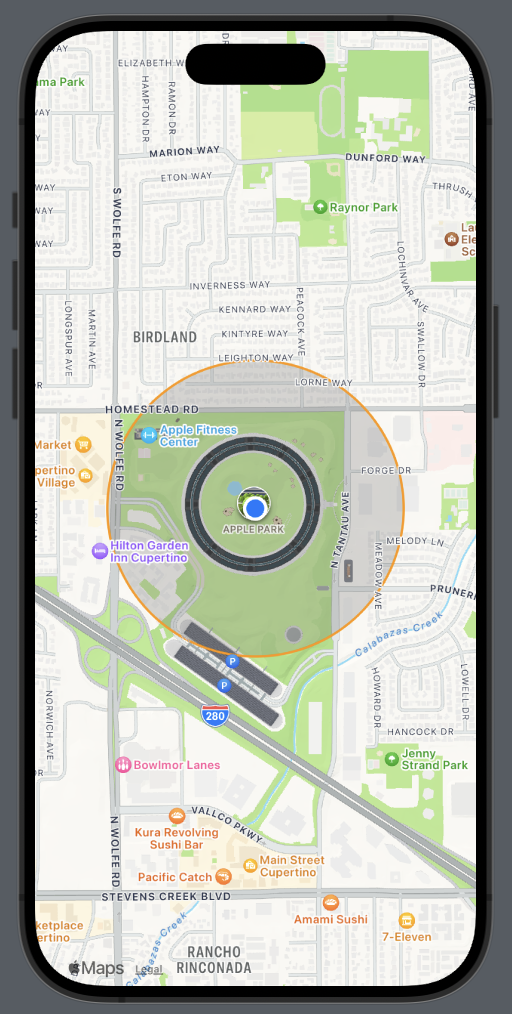
Here we’ve added a distance (in meters) that we use as the radius for the MapCircle. The MapCircle is centered using the coordinates of the user, obtained through the locationManager. In the image, you’ll also see a black circle; that’s Apple Park.

That’s all for this episode.

Horizontal Menu in SwiftUI

In this post, we’ll learn how to build a horizontal menu similar to the one used in the Medium mobile application, like this:

The code is:

struct MenuSwiftUIView: View {
    var days = ["Monday", "Tuesday", "Wednesday", "Thursday",
    "Friday", "Saturday", "Sunday"]
    @State var selected = 0
    var body: some View {
        VStack {
            ScrollView(.horizontal) {
                HStack(spacing: 0) {
                    ForEach(Array(days.enumerated()), id: \.offset) {  index, day in
                        VStack {
                            Text(day).padding(5)
                                .foregroundStyle(.white)
                            if selected == index {
                                Color(.white)
                                    .frame(height: 2)
                            } else {
                                Color(.gray)
                                    .frame(height: 1)
                            }
                                
                        }.onTapGesture {
                            selected = index
                        }
                    }
                }
            }.scrollIndicators(ScrollIndicatorVisibility.hidden)
            Spacer() // Here what you want show considering the selected value
        }.padding()
        .background(.black)
    }
}

We define an array of strings that contains the menu options and a variable selected to store the value of the selected index in the menu.

The menu is built using a ScrollView that scrolls horizontally. In this, we add the Text that shows the label and the bottom line.

The HStack has spacing set to zero to avoid space between the bottom lines.

To have the index of the elements, we create a collection of indices and elements with Array(days.enumerated())

[(offset: 0, element: "Monday"), (offset: 1, element: "Tuesday"), (offset: 2, element: "Wednesday"), (offset: 3, element: "Thursday"), (offset: 4, element: "Friday"), (offset: 5, element: "Saturday"), (offset: 6, element: "Sunday")]

We hide the scrollbar in this way:

.scrollIndicators(ScrollIndicatorVisibility.hidden)

The line (indicator) changes color depending on the selected item.

For the last step, we can extract the ScrollView to create a reusable component:

struct HorizontalMenu: View {
    var labels: Array<String> = []
    var defaultColor = Color.gray
    var selectedColor = Color.white
    var textColor = Color.white
    
    @Binding var selected: Int
    
    var body: some View {
        ScrollView(.horizontal) {
            HStack(spacing: 0) {
                ForEach(Array(labels.enumerated()), id: \.offset) {  index, label in
                    VStack {
                        Text(label).padding(5)
                            .foregroundStyle(textColor)
                        if selected == index {
                            selectedColor
                                .frame(height: 2)
                        } else {
                            defaultColor
                                .frame(height: 1)
                        }
                        
                    }.onTapGesture {
                        selected = index
                    }
                }
            }
        }.scrollIndicators(ScrollIndicatorVisibility.hidden)
    }
}

Note that we bind the selected variable because we need to use its value in the main view.

Thus, the code becomes:

struct MenuSwiftUIView: View {
    var days = ["Monday", "Tuesday", "Wednesday", "Thursday",
    "Friday", "Saturday", "Sunday"]
    @State var selected = 0
    var body: some View {
        VStack {
            HorizontalMenu(labels: days, selected: $selected)
            Spacer() // Here what you want show considering the selected value
        }.padding()
        .background(.black)
    }
}

(Blog image from unsplash)

Segmented Control in SwiftUI

In this post we’ll learn:

  • How to create a segment control.
  • How to customize the look and feel of a segment control.

Create the segment control

Let’s start by creating a segment control that allows choosing from the days of the week:

struct SegUIView: View {
    @State private var daySelected = 0
    var body: some View {
        VStack {
            Picker("Choose a day", selection: $daySelected) {
                Text("Mo").tag(0)
                Text("Tu").tag(1)
                Text("We").tag(2)
                Text("Th").tag(3)
                Text("Fr").tag(4)
                Text("Sa").tag(5)
                Text("Su").tag(6)
            }
            .pickerStyle(.segmented)
            Text("Selected the day \(daySelected)")
            Spacer()
        }.padding()
    }
}

So, the Segment Control is created by using a Picker and setting its style to segmented. If you remove this style, the default Picker appears as a contextual menu.

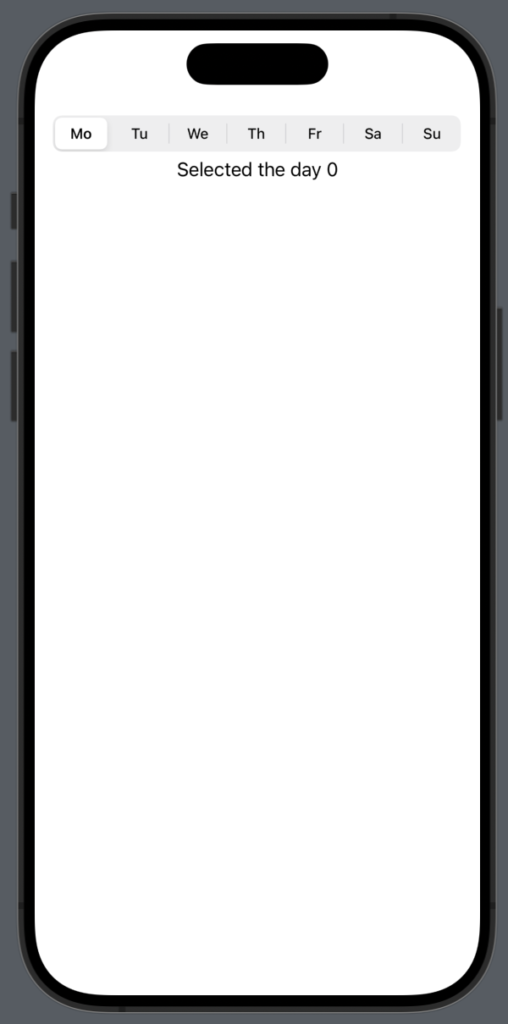
The state variable daySelected stores the tag value of the selected item. We then simply display this value in a Text.

Thus we have:

Thus, upon selecting a day, we see the number corresponding to daySelected (the tag number).

To create something more realistic, we can create a function that returns a view for the different daySelected:

@ViewBuilder
func DayView(day: Int) -> some View {
    switch (day) {
    case 0:
        Text("Monday")
    case 1:
        Text("Tuesday")
    case 2:
        Text("Wednesday")
    case 3:
        Text("Thursday")
    case 4:
        Text("Friday")
    case 5:
        Text("Saturday")
    case 6:
        Text("Sunday")
    default:
        Text("")
    }
    
}

By replacing the code in the body, we can update the view dynamically based on the daySelected. Here’s how it’s done:

var body: some View {
        VStack {
            Picker("Choose a day", selection: $daySelected) {
                Text("Mo").tag(0)
                Text("Tu").tag(1)
                Text("We").tag(2)
                Text("Th").tag(3)
                Text("Fr").tag(4)
                Text("Sa").tag(5)
                Text("Su").tag(6)
            }
            .pickerStyle(.segmented)
            DayView(day: daySelected)
            Spacer()
        }.padding()
    }

Customize the Segment Control

The background of the Picker can be changed by using its background property:

var body: some View {
        VStack {
            Picker("Choose a day", selection: $daySelected) {
                Text("Mo").tag(0)
                Text("Tu").tag(1)
                Text("We").tag(2)
                Text("Th").tag(3)
                Text("Fr").tag(4)
                Text("Sa").tag(5)
                Text("Su").tag(6)
            }
            .pickerStyle(.segmented)
            .background(.yellow)
            DayView(day: daySelected)
            Spacer()
        }.padding()
    }

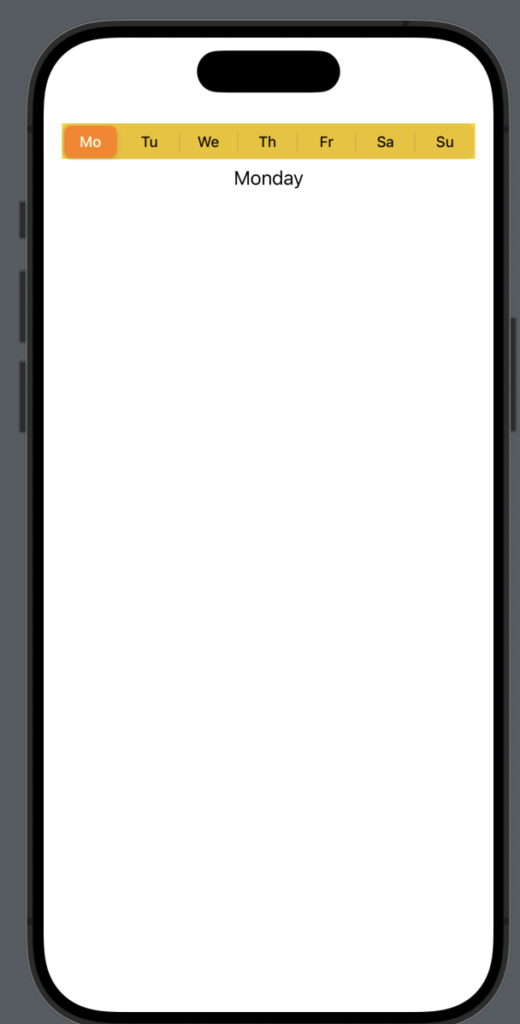
Instead, to change the properties of the text and the background color of the selected element, we need to use code from UIKit. Therefore, we define an init function in this way:

init() {
    // Color for the selected item
    UISegmentedControl.appearance().selectedSegmentTintColor = UIColor.orange
    
    // The text color for the selected item
UISegmentedControl.appearance().setTitleTextAttributes([.foregroundColor: UIColor.white], for: .selected)
}

So we have:

If we want to remove the separator between the days, we can add this code to the init function:

UISegmentedControl.appearance().setDividerImage(UIImage(), forLeftSegmentState: .normal, rightSegmentState: .normal, barMetrics: .default)

To change the text color of the unselected items, add the following code:

UISegmentedControl.appearance().setTitleTextAttributes([.foregroundColor: UIColor.magenta], for: .normal)

The code https://github.com/niqt/swift/tree/master/SegmentController

Playing music in SwiftUI application

In this short post, we’ll learn how to add the play function to our SwiftUI application. To test this functionality, we will add a Christmas song to our previous project (timer-and-shape-in-swiftui).

First, we need to create a player. We’ll do this by using the new Observable class annotation, which also works in the latest iOS 17. Some might wonder why I’m focusing on the latest features. The goal of my post is to update current iOS developers on the latest advancements and to help new developers, who usually start by using the most recent tools, create code effectively.

So, let’s take a look at the player:

import AVFoundation

@Observable
class AudioPlayerViewModel {
  var audioPlayer: AVAudioPlayer?

  var isPlaying = false

  init() {
    if let sound = Bundle.main.path(forResource: "silent", ofType: "mp3") {
      do {
        self.audioPlayer = try AVAudioPlayer(contentsOf: URL(fileURLWithPath: sound))
      } catch {
        print("AVAudioPlayer can't be instantiated.")
      }
    } else {
      print("Audio file not found.")
    }
  }

  func playOrPause() {
    guard let player = audioPlayer else { return }

    if player.isPlaying {
      player.pause()
      isPlaying = false
    } else {
      player.play()
      isPlaying = true
    }
  }
}

First, we import the AVFoundation framework, as described in the official documentation at https://developer.apple.com/av-foundation/. As we can read there: “AVFoundation is the full featured framework for working with time-based audiovisual media on iOS, macOS, watchOS and tvOS. Using AVFoundation, you can easily play, create, and edit QuickTime movies and MPEG-4 files, play HLS streams, and build powerful media functionality into your apps”.

In the class, the player is defined as an optional, because it could be null for some reason. After that, we retrieve the path to the file we want to play and pass it to the player’s constructor. If something goes wrong, we’ll see an error message.

The method playOrPause, plays or stops the music depending the current playing state.

Regarding the audio file, it has not been added to the assets, but rather to the project structure.

Now add the player to the code:

.
.
@State var audioPlayerViewModel = AudioPlayerViewModel()
    
    var body: some View {
        ZStack {
            Color.black.frame(maxWidth: .infinity, maxHeight: .infinity).opacity(0.9).edgesIgnoringSafeArea(.all)
            VStack(spacing: 0) {
                Image(systemName: stars[indexStar])
                    .resizable()
                    .frame(width: 100, height: 100)
                    .foregroundStyle(.yellow)
                    .offset(y: 20)
                TriangleWidthDecoration(triangleWidth: 260, leftColorDecoration: currentColors[3], rightColorDecoration: currentColors[7])
                
            }.offset(y: -50)
            ForEach(Array(widths.enumerated()), id: \.offset) { index, leaf in
                TriangleWidthDecoration(triangleWidth: Double(leaf), leftColorDecoration: currentColors[index], rightColorDecoration: currentColors[index * 2])
                    .offset(y: 60 * Double( index + 1))
            }
            
            Rectangle()
                .frame(width: 20, height: 60)
                .foregroundStyle(.brown)
                .offset(y: 360)
        }.onReceive(timer) { _ in
            shuffleColor()
            self.indexStar = (self.indexStar + 1) % 2
        }.onAppear {
            audioPlayerViewModel.playOrPause()
        }.onTapGesture {
            audioPlayerViewModel.playOrPause()
        }
    }
    
    func shuffleColor() {
        for i in 0..<currentColors.count {
            currentColors[i] = colors[Int.random(in: 0..<9)]
        }
    }
}

The music starts when the tree appears. You can play or stop it by tapping on the tree.

You can obtain a free MP3 file from this source: https://www.freemusicpublicdomain.com/royalty-free-christmas-music/

The code is here

https://github.com/niqt/swift/tree/master/ChristmasTree

That’s all.

Note: English is not my native language, so I’m sorry for some errors. I appreciate if your correct me.

Timer and Shape in SwiftUI

Creating a Dynamic Christmas Tree with Decorations and Light Effects

In this blog, we’ll learn:

  • how create geometric triangle.
  • How create a tree using triangles.
  • How use a timer to change the color of the Christmas tree decorations.

Shortly, we’ll create this (tree.mov):

Create the triangle

struct Triangle: Shape {
    func path(in rect: CGRect) -> Path {
        var path = Path()

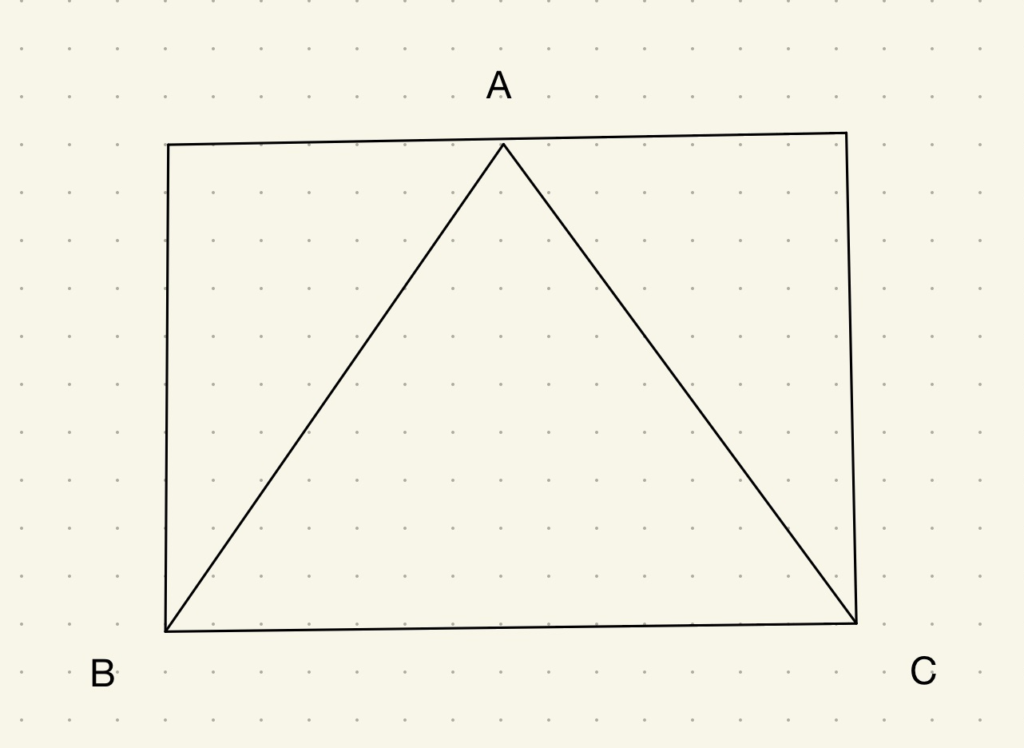
        path.move(to: CGPoint(x: rect.midX, y: rect.minY)) // A
        path.addLine(to: CGPoint(x: rect.minX, y: rect.maxY)) // AB
        path.addLine(to: CGPoint(x: rect.maxX, y: rect.maxY)) // BC
        path.addLine(to: CGPoint(x: rect.midX, y: rect.minY)) // CA

        return path
    }
}

First, the triangle implements the Shape protocol and creates a triangular shape by drawing in this way (considering that we pass a rectangle/frame):

Remember that the coordinates start from the top of the screen.

Create the tree

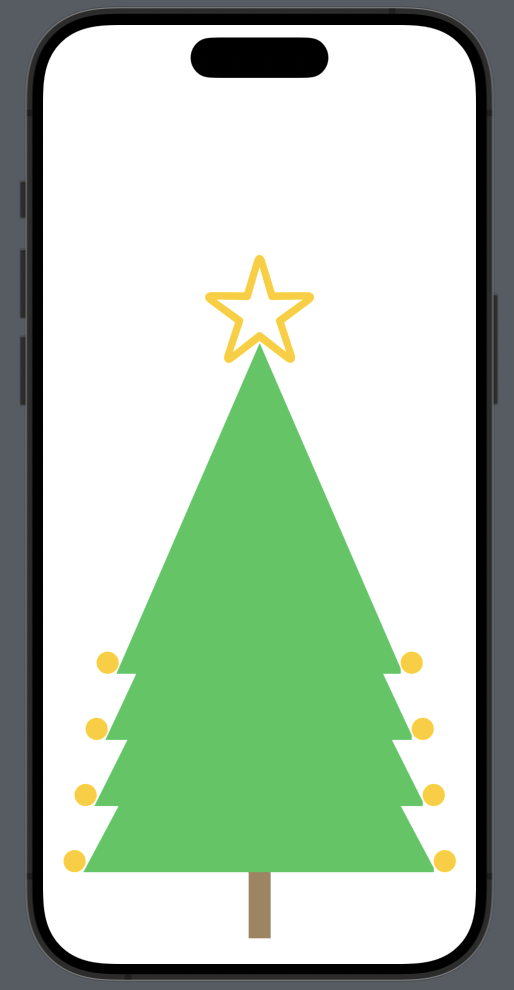
We want to create a tree by overlapping triangles, similar to this Christmas tree

struct ContentView: View {
    var body: some View {
        ZStack {
            VStack(spacing: 0) {
                Image(systemName: "star")
                    .resizable()
                    .frame(width: 100, height: 100)
                    .foregroundStyle(.yellow)
                    .offset(y: 20)
                HStack(alignment: .bottom) {
                 Circle().background().foregroundStyle(.yellow).frame(width: 20, height: 20)
                    .offset(x: 10)
                    Triangle()
                        .frame(width: 260, height: 300)
                        .foregroundStyle(.green)
                    Circle().background().foregroundStyle(.yellow).frame(width: 20, height: 20)
                        .offset(x: -10)
                }
            }.offset(y: -50)
            HStack(alignment: .bottom) {
                Circle().background().foregroundStyle(.yellow).frame(width: 20, height: 20)
                    .offset(x: 10)
                Triangle()
                    .frame(width: 280, height: 300)
                    .foregroundStyle(.green)
                
                Circle().background().foregroundStyle(.yellow).frame(width: 20, height: 20)
                    .offset(x: -10)
            }.offset(y: 60)
            
            HStack(alignment: .bottom) {
                Circle().background().foregroundStyle(.yellow).frame(width: 20, height: 20)
                    .offset(x: 10)
                Triangle()
                    .frame(width: 300, height: 300)
                    .foregroundStyle(.green)
                
                Circle().background().foregroundStyle(.yellow).frame(width: 20, height: 20)
                    .offset(x: -10)
            }.offset(y: 120)
            HStack(alignment: .bottom) {
                Circle().background().foregroundStyle(.yellow).frame(width: 20, height: 20)
                    .offset(x: 10)
                Triangle()
                    .frame(width: 320, height: 300)
                    .foregroundStyle(.green)
                
                Circle().background().foregroundStyle(.yellow).frame(width: 20, height: 20)
                    .offset(x: -10)
            }.offset(y: 180)
            Rectangle()
                .frame(width: 20, height: 60)
                .foregroundStyle(.brown)
                .offset(y: 360)
        }
    }
}

(Don’t worry, I’ll provide the GitHub link at the end.)

Let’s explore how this code works:

  • We use a ZStack to overlap the triangles.
  • We start from the bottom by adding the trunk.
  • Begin with the first triangle within an HStack, accompanied by two yellow circles representing the decorations. Everything is aligned at the bottom because we want to move the circles near the base of the triangle. We use the offset to position the circles, as well as to position the triangle.
  • The other triangles are added by changing the offset and the size of each triangle.
  • At the end (actually at the beginning of the code), we have a VStack that contains the first triangle with a star on top.

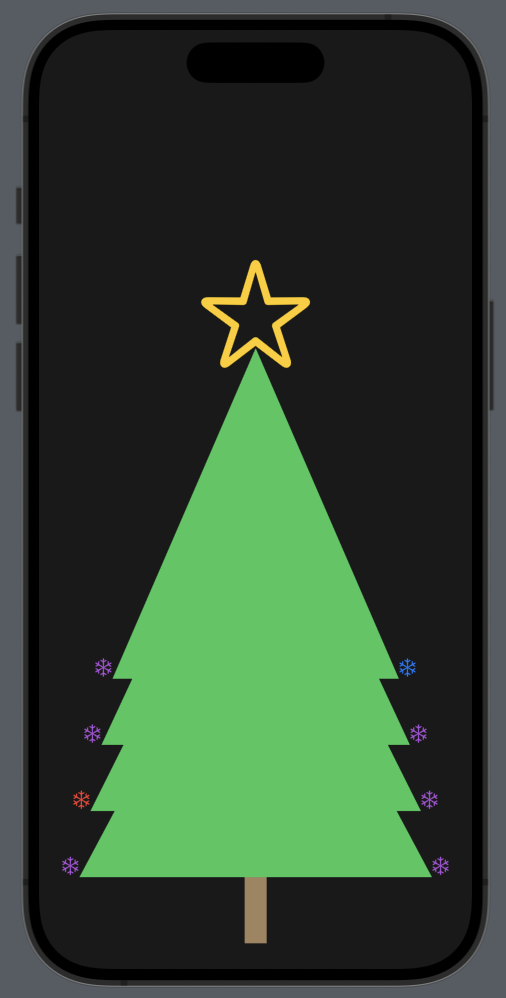
Now we have this:

It’s not quite what we want yet, and the code could be improved. Let’s do some refactoring.

Use the timer

First, we create a view that contains a triangle with two decorations:

struct TriangleWidthDecoration: View {
    var triangleWidth: Double = 300
    var leftColorDecoration: Color = .yellow
    var rightColorDecoration: Color = .yellow
    let triangleHeight: Double = 300
    
    var body: some View {
        HStack(alignment: .bottom) {
            Image(systemName: "snowflake")
                .foregroundStyle(leftColorDecoration)
            .frame(width: 20, height: 20)
                .offset(x: 10)
            Triangle()
                .frame(width: triangleWidth, height: triangleHeight)
                .foregroundStyle(.green)
            Image(systemName: "snowflake")
                .foregroundStyle(rightColorDecoration)
                .frame(width: 20, height: 20)
                .offset(x: -10)
        }
    }
}

So, we define four properties:

  • triangleWidth: the lenght of the base
  • triangleHeight: the constant height of the triangle
  • leftColorDecoration: the color of the decorarion on the left side
  • rightColorDecoration: the color of the decoration on the right side

Note that now the decoration is a snowflake.

Now the main code is:

var body: some View {
        ZStack {
            VStack(spacing: 0) {
                Image(systemName: "star")
                    .resizable()
                    .frame(width: 100, height: 100)
                    .foregroundStyle(.yellow)
                    .offset(y: 20)
                TriangleWidthDecoration(triangleWidth: 260, leftColorDecoration: .yellow, rightColorDecoration: .yellow)
                
            }.offset(y: -50)
            ForEach(Array(widths.enumerated()), id: \.offset) { index, leaf in
                TriangleWidthDecoration(triangleWidth: Double(leaf), leftColorDecoration: .yellow, rightColorDecoration: .yellow)
                    .offset(y: 60 * Double( index + 1))
            }
            
            Rectangle()
                .frame(width: 20, height: 60)
                .foregroundStyle(.brown)
                .offset(y: 360)
        }
    }

Apart from the triangle on the top, the others are drawn using a ForEach loop, where for each triangle, the offset is calculated using the index (pay close attention to the ForEach definition). The width is obtained from this array:

var widths = [280, 300, 320]

The work is not yet complete because we want to achieve the effect of real Christmas lights, with random colors. Therefore, we add:

var widths = [280, 300, 320]
    let timer = Timer.publish(every: 1, on: .main, in: .common).autoconnect()
    var colors = [Color.red, Color.purple, Color.blue, Color.orange, Color.gray, Color.yellow, Color.cyan, Color.mint, Color.pink]
    var stars = ["star", "star.fill"]
    @State var indexStar = 0
    @State var currentColors = [Color]( repeating: .gray, count: 8 )

The timer is used to change the color every second.

  • The colors: a list of colors that can be used for the decorations.
  • The stars: contains the possible images for the star.
  • The indexStar: contains the index of the current image used for the star.
  • The currentColors: contains the current colors (note that there are eight, four per side).

The timer run in the main thread because work in the GUI side and with the .common option because work alongside with common events.

The code now is:

var body: some View {
        ZStack {
            Color.black.frame(maxWidth: .infinity, maxHeight: .infinity).opacity(0.9).edgesIgnoringSafeArea(.all)
            VStack(spacing: 0) {
                Image(systemName: stars[indexStar])
                    .resizable()
                    .frame(width: 100, height: 100)
                    .foregroundStyle(.yellow)
                    .offset(y: 20)
                TriangleWidthDecoration(triangleWidth: 260, leftColorDecoration: currentColors[3], rightColorDecoration: currentColors[7])
                
            }.offset(y: -50)
            ForEach(Array(widths.enumerated()), id: \.offset) { index, leaf in
                TriangleWidthDecoration(triangleWidth: Double(leaf), leftColorDecoration: currentColors[index], rightColorDecoration: currentColors[index * 2])
                    .offset(y: 60 * Double( index + 1))
            }
            
            Rectangle()
                .frame(width: 20, height: 60)
                .foregroundStyle(.brown)
                .offset(y: 360)
        }.onReceive(timer) { _ in
            shuffleColor()
            self.indexStar = (self.indexStar + 1) % 2
        }
    }

The color for the decorations is taken from the currentColors array, using the index. Every second, the colors are remixed using the shuffleColor function, and the image of the star is changed because the indexStar is updated (there are only two possible values: 0 or 1).

The timer event is captured using the onReceive with the timer (we use the underscore because we don’t need the timer’s value).

The shuffle functions is:

func shuffleColor() {
        for i in 0..<currentColors.count {
            currentColors[i] = colors[Int.random(in: 0..<9)]
        }
    }

Finally, at the beginning of the ZStack, a dark background is set.

https://github.com/niqt/swift/tree/master/ChristmasTree

That’s all.

Note: English is not my native language, so I’m sorry for some errors. I appreciate if your correct me.